Camera Layouts on iOS
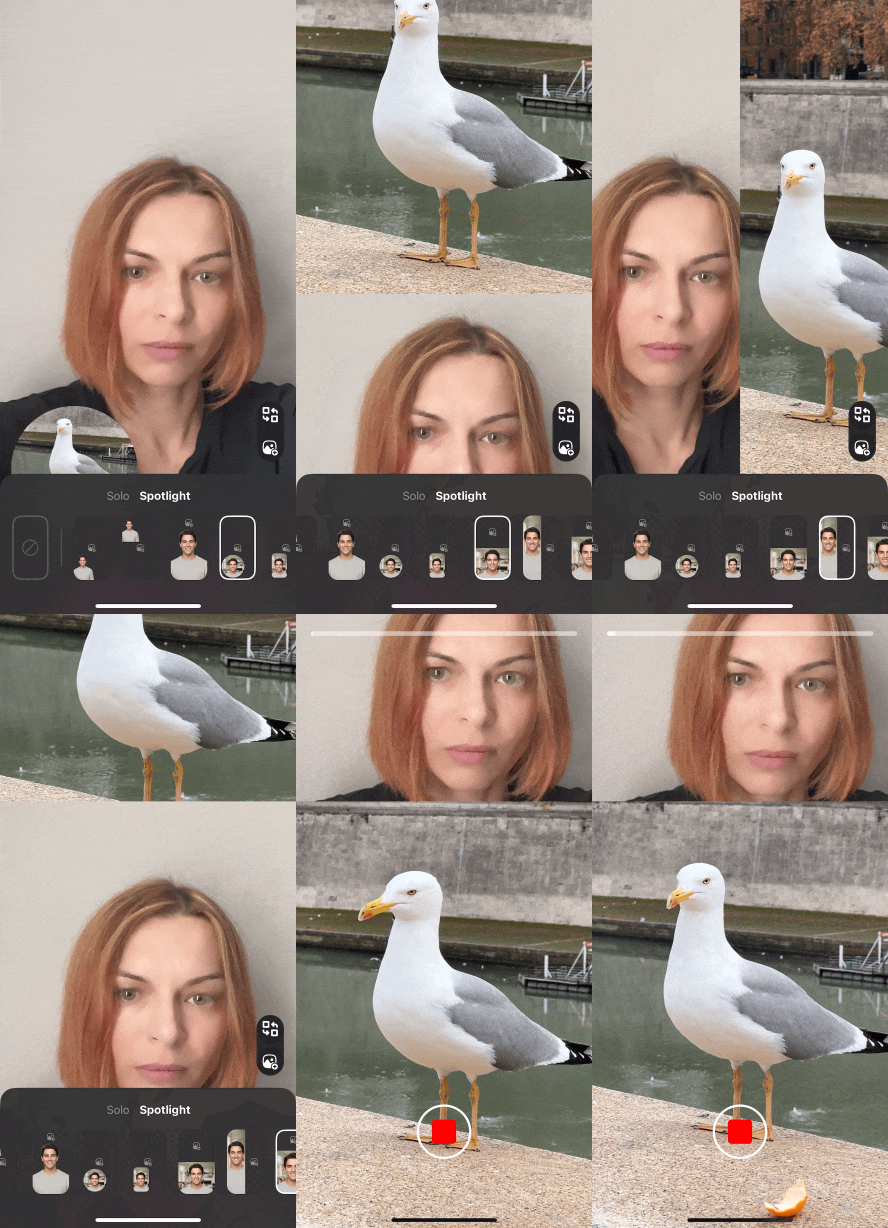
Camera Layouts is a set of camera recording layouts that combine the camera feed with additional content in a single video. Users can choose from the following options:
- Blur — Softens the background to keep the subject in focus.
- Custom color — Replaces the background with any solid color.
- Media — Uses an image or a video file as the background.
- Weatherman — Places the user over the background media, the way a TV presenter is shown.
- Picture in Picture — Combines the camera with a second video side by side or as an insert.
This feature replaces the previous Green Screen, Weatherman and PIP features. All of them are now included under Camera Layouts.
The feature requires the Face AR product with Background Segmentation feature enabled. Without Background Segmentation, the background replacement layouts will not appear or function. Contact Banuba representatives to enable it
Layouts are gated per group: PiP layouts require the PiP feature, weatherman layouts require the weatherman feature, and blur / green screen layouts require background separation together with Face AR. Layouts that the license does not cover are hidden from the panel.
Camera Layouts replaces the standalone PIP screen used before 1.54.2. All PiP modes are still available, they are now selected from the Layouts panel on the camera screen.
The multi-layer recording effect is perfect for reaction videos, slideshows, product demos, and more. This feature is similar to the TikTok duet feature.
The subsequent guide explains how to start and customize Camera Layouts.
Supported layouts
Layouts are grouped into two modes on the camera screen: Solo, where the user is separated from the background, and Spotlight, where the camera is combined with a second video.
CameraLayout | Mode | Payload | Description |
|---|---|---|---|
blur | Solo | not required | blurred background behind the user |
greenScreen | Solo | .color(UIColor) | solid color background, green by default |
greenScreenWithMedia | Solo | .media(URL) | image or video as the background |
weathermanTopLeft | Spotlight | .media(URL) | user in the top left corner over the media |
weathermanBottomLeft | Spotlight | .media(URL) | user in the bottom left corner over the media |
weathermanCenter | Spotlight | .media(URL) | user in the center over the media |
pipCircleBottom | Spotlight | .media(URL) | circle camera insert over the video |
pipRectangleBottom | Spotlight | .media(URL) | rectangle camera insert over the video |
pipBottom | Spotlight | .media(URL) | video and camera split horizontally |
pipLeft | Spotlight | .media(URL) | video and camera split vertically |
pipTwoThirdBottom | Spotlight | .media(URL) | video on top two thirds, camera below |
When the user picks a Spotlight layout or greenScreenWithMedia and no media has been selected yet, the gallery opens automatically: PiP layouts ask for a video, the other layouts accept a video or an image. The selected media is kept while the user switches between layouts.
Opening the camera with a preselected layout
Create VideoEditorLaunchConfig in ExampleViewController
and provide the layout along with its media:
let launchConfig = VideoEditorLaunchConfig(
        entryPoint: .camera,
        hostController: self,
        cameraLayout: VideoEditorLaunchConfig.CameraLayoutConfig(
          layout: .pipCircleBottom,
          payload: .media(resultUrls[.zero])
        ),
        animated: true
)
self.presentVideoEditor(with: launchConfig)
CameraLayoutConfig is a failable initializer. Every layout except .blur and .greenScreen requires .media(URL), otherwise the initializer returns nil and the camera opens with the default layout.
.blur ignores the payload and accepts .none, .greenScreen accepts .color(UIColor) and falls back to green when another payload is passed.
// no media required
let blur = VideoEditorLaunchConfig.CameraLayoutConfig(layout: .blur, payload: .none)
let color = VideoEditorLaunchConfig.CameraLayoutConfig(layout: .greenScreen, payload: .color(.systemPink))
The preselected layout is applied once the camera pipeline has started and the camera is switched to the front one. cameraLayout is ignored for the editor and trimmer entry points.
Customizing the entry point
The Layouts panel is opened with the layouts button in the camera controls. Use AdditionalEffectsButtonConfiguration with the .layouts identifier to restyle it:
var config = VideoEditorConfig()

config.recorderConfiguration.additionalEffectsButtons = [
  AdditionalEffectsButtonConfiguration(
    identifier: .layouts,
    imageConfiguration: ImageConfiguration(imageName: "camera_control.layouts"),
    selectedImageConfiguration: ImageConfiguration(imageName: "camera_control.layouts"),
    title: TextButtonConfiguration(style: makeTextStyle(), text: "Layouts"),
    titlePosition: .left,
    width: 120,
    height: 36.0
  ),
  ...
]
Camera controls are laid out in the order of the additionalEffectsButtons array. Remove the .layouts configuration from the array to hide the feature completely.
In photo mode the layouts button is shown only when the license covers background separation or weatherman layouts.
Migrating from PIP
pipVideoItem is removed in 1.54.2. Pass the same video in cameraLayout and specify the layout that used to be selected on the PIP settings screen:
let launchConfig = VideoEditorLaunchConfig(
        entryPoint: entryPoint,
        hostController: self,
        videoItems: resultUrls,
        pipVideoItem: resultUrls[.zero],
        cameraLayout: VideoEditorLaunchConfig.CameraLayoutConfig(
          layout: .pipCircleBottom,
          payload: .media(resultUrls[.zero])
        ),
        animated: true
)
Note that videoItems is no longer needed to start the feature: with the camera entry point the layout media is taken from cameraLayout only.
The old PIP modes map to CameraLayout as follows:
PIP mode | CameraLayout |
|---|---|
.react | pipCircleBottom for the round camera insert, pipRectangleBottom for the rectangle one |
.topBottom | pipBottom for the equal split, pipTwoThirdBottom for the two thirds split |
.leftRight | pipLeft |
.floating | not available, use pipCircleBottom or pipRectangleBottom |
PIPSettingsConfiguration.layoutSettingsButtonsConfiguration and PIPSelectableCellConfiguration were removed earlier, in 1.53.1, together with the standalone PIP settings screen. The set of layouts is no longer configurable: the panel shows every layout the license covers. Styling of the entry point is done with the .layouts button configuration described above.