Face AR SDK for Unity Overview

Unity Face AR SDK provides ready-to-use assets (prefabs, scripts, materials, scenes and etc.) for fast integration based on BanubaSDKBridge API.
BanubaSDKManager
script: Assets/BanubaFaceAR/BaseAssets/Scripts/BanubaSDKManager.cs
Public Properties:
- Max Face Count - Set the maximum number of faces to search
BanubaSDKManager.cs main functionality:
- initialize BanubaSDK with token
        private void Awake()
        {
            //...
            // Load Token
            var tokenResourceFile = Resources.Load<TextAsset>("BanubaClientToken");
            var tokenLine = tokenResourceFile.text.Trim();

            // Banuba Face AR SDK static environment initialization
            var error = IntPtr.Zero;
            BanubaSDKBridge.bnb_recognizer_env_init(tokenLine, out error);
            Utils.CheckError(error);
            // The recognizer object init method needs a path to its resources. They are placed in
            // Assets/StreamingAssets folder, and unity does not compress resources placed there which is important.
            // Full path to Assets/StreamingAssets is platform dependent. Unity provides it as
            // Application.streamingAssetsPath property.
            // We recommend using only one instance of the recognizer object to decrease memory consumption.
#if (UNITY_ANDROID || UNITY_WEBGL) && !UNITY_EDITOR
            var resourcesPath = Application.persistentDataPath;
#else
            var resourcesPath = Application.streamingAssetsPath;
#endif
            Recognizer = new Recognizer(resourcesPath + "/BanubaFaceAR/");
            // set maximum faces to search
            BanubaSDKBridge.bnb_recognizer_set_max_faces(Recognizer, _maxFaceCount, out error);
            Utils.CheckError(error);

            //...
        }
- Process the input image and notify the subscribers if there is a recognition result with
public event Action<FrameData> onRecognitionResult;
        public static bool processCameraImage(BanubaSDKBridge.bnb_bpc8_image_t cameraImage)
        {
            if (instance == null) {
                return false;
            }

            var error = IntPtr.Zero;
            var frameData = BanubaSDKBridge.bnb_frame_data_init(out error);
            Utils.CheckError(error);
            BanubaSDKBridge.bnb_frame_data_set_bpc8_img(frameData, ref cameraImage, out error);
            Utils.CheckError(error);

            BanubaSDKBridge.bnb_recognizer_push_frame_data(instance.Recognizer, frameData, out error);
            Utils.CheckError(error);

            var outFrameData = new FrameData();
            bool process = BanubaSDKBridge.bnb_recognizer_pop_frame_data(instance.Recognizer, outFrameData, out error);
            Utils.CheckError(error);
            if (process) {
                instance.onRecognitionResult?.Invoke(outFrameData);
            }

            return process;
        }
All other feature-based instances must subscribe to onRecognitionResult
        private void Awake()
        {
            BanubaSDKManager.instance.onRecognitionResult += OnRecognitionResult;
        }
        private void OnDestroy()
        {
            BanubaSDKManager.instance.onRecognitionResult -= OnRecognitionResult;
        }
        private void OnRecognitionResult(FrameData frameData)
        {
            // Do Something with frameData
        }
Currently BanubaSDKManager.cs provides synchronous image processing only, but BanubaSDK API also privides async processing.
Camera Device
script: Assets/BanubaFaceAR/BaseAssets/Scripts/CameraDevice.cs
Camera device class is based on WebCamTexture. It takes an image from the camera device and pushes it to the BanubaSDKManager
            // Create Camera Image
            var cameraImage = new BanubaSDKBridge.bnb_bpc8_image_t {
                format = new BanubaSDKBridge.bnb_image_format_t()
            };
            // Create Color32 pixel array
            var data = new Color32[texSize];
            //...
            // Fill the data with WebCamTexture.GetPixels32(data) or any other method
            // depends on what you want to process
            //...

            // Marshaling
            GCHandle pinnedData = GCHandle.Alloc(data, GCHandleType.Pinned);;

            cameraImage.format.orientation = AngleToOrientation(0); // image orientation
            cameraImage.format.require_mirroring = 1; // selfie mode (horisontal flip)
            cameraImage.format.face_orientation = 0;
            cameraImage.format.width = (uint) width;
            cameraImage.format.height = (uint) height;
            cameraImage.data = pinnedData.AddrOfPinnedObject(); //retrieve the IntPtr
            cameraImage.pixel_format = BanubaSDKBridge.bnb_pixel_format_t.BNB_RGBA; //image format

            // Process image with BanubaSDKManager
            BanubaSDKManager.processCameraImage(cameraImage);

            // Free pinned data
            pinnedData.Free();
It also provides public event Action<Texture2D, CameraTextureData> onCameraTexture;
that allows subscribers to retrieve some data from the original
camera image like Plane Controller
Camera
Components:
- script:
Assets/BanubaFaceAR/BaseAssets/Scripts/CameraController.csRetrieve the needed camera settings based on the recognition result.
Camera Plane
Components:
- script:
Assets/BanubaFaceAR/BaseAssets/Scripts/PlaneController.cs
A Canvas UI element for rendering camera image with right transformation.
A child of the Surface Canvas
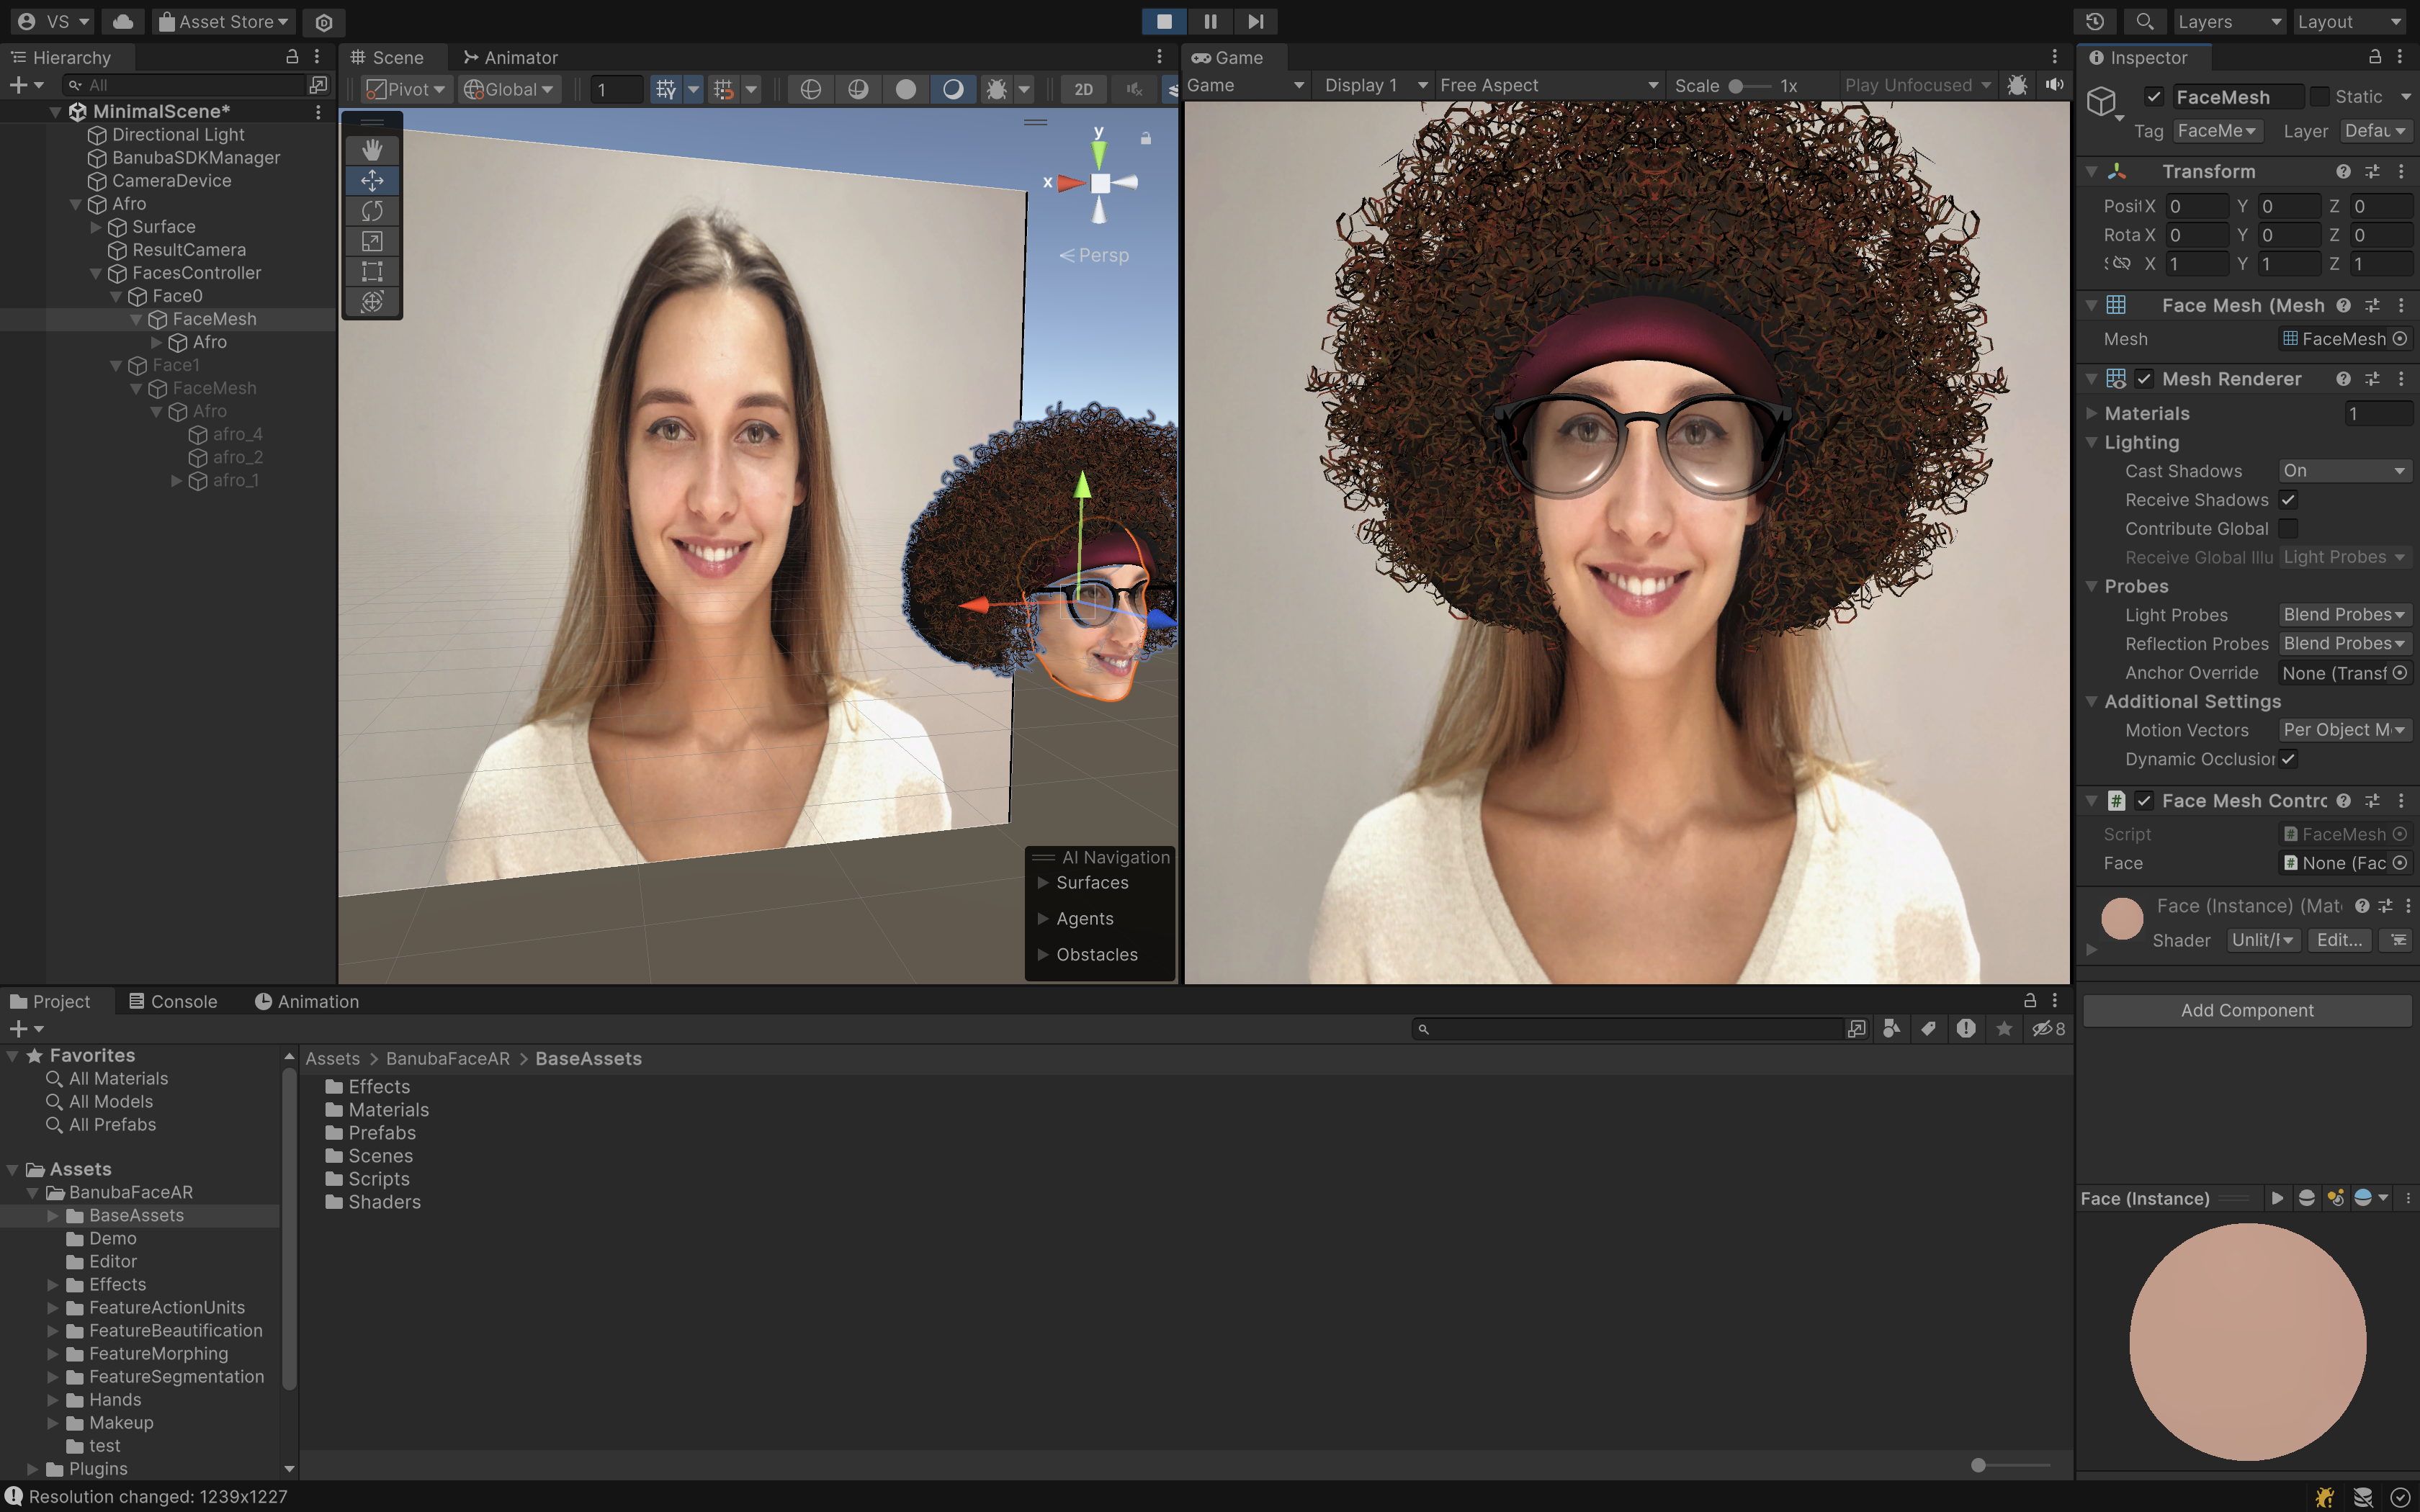
Face AR Effect
Faces Controller
script: Assets/BanubaFaceAR/BaseAssets/Scripts/FacesController.cs
A ready-to-use prefab for rendering Face Mesh
Properties:
-
Enable UV Draw - Instanciate a UV Draw Component (Difference between static and dynamic face meshes)
-
Enable Static Pos - Instanciate a Static Pos Component (Face Mesh without mimics)
Instanciate GameObjects with FaceController Component depending on faces detected on the camera image. By default it contains Face0 Object as a child and if detected faces > 1, it copies Face0 and increments it's index.
Maximum searching face count setup placed in the properties of the BanubaSDKManager
Face Controller
script: Assets/BanubaFaceAR/BaseAssets/Scripts/FaceController.cs
Apply transformations retrieved from the Frame Data
Face Mesh Controller
script: Assets/BanubaFaceAR/BaseAssets/Scripts/FaceMeshController.cs
A basic Component for rendering Face Mesh
Face AR example
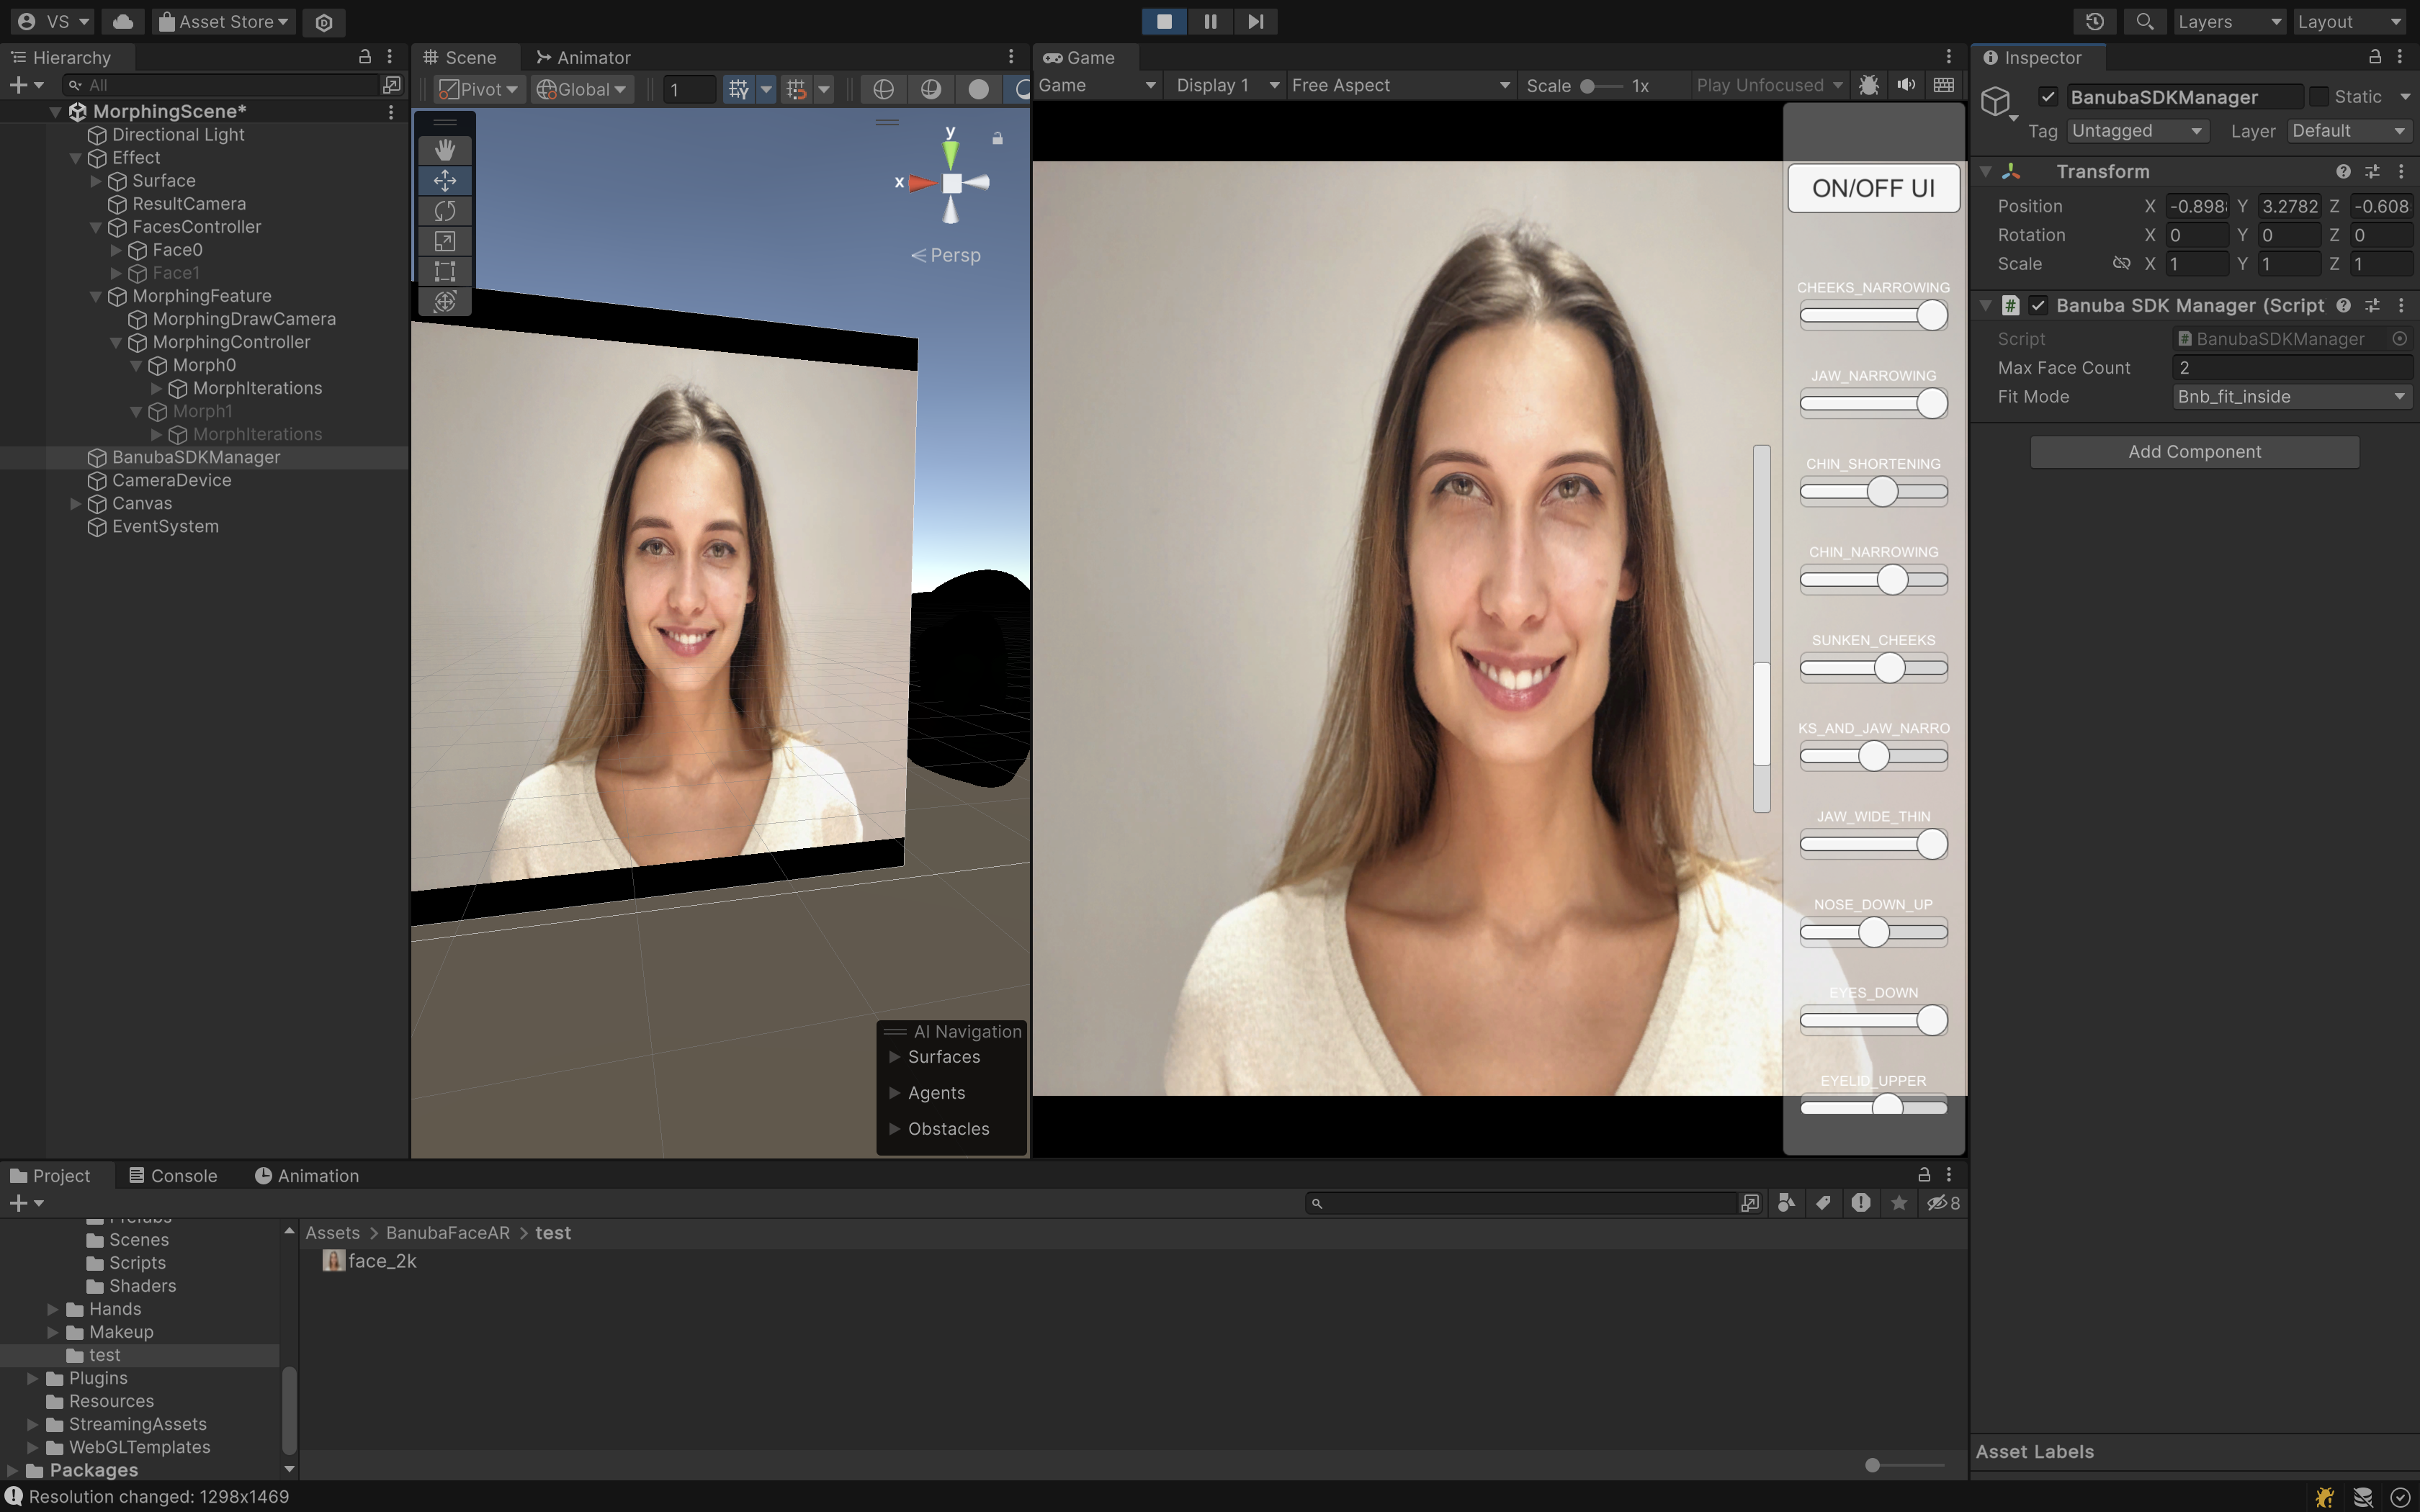
Morphing
Morphing Feature
Components:
- script:
Assets/BanubaFaceAR/FeatureMorphing/Scripts/MorphingFeature.cs
A ready-to-use prefab for applying face morphing filter.
Public Properies:
- Morph Shape -
IMorphDrawcomponent field. Defines the type of the morphing filter. Available shapes: - Faces Controller
- Effect Reference
Morphing Draw Camera
Components:
- script:
Assets/BanubaFaceAR/BaseAssets/Scripts/Blur.cs - script:
Assets/BanubaFaceAR/BaseAssets/Scripts/CameraDevice.cs - script:
Assets/BanubaFaceAR/BaseAssets/Scripts/RenderToTexture.cs
This camera renders a blurred difference between Face Mesh vertices and Morphing Shape vertices to the
RenderTexture with RenderToTexture.cs Component
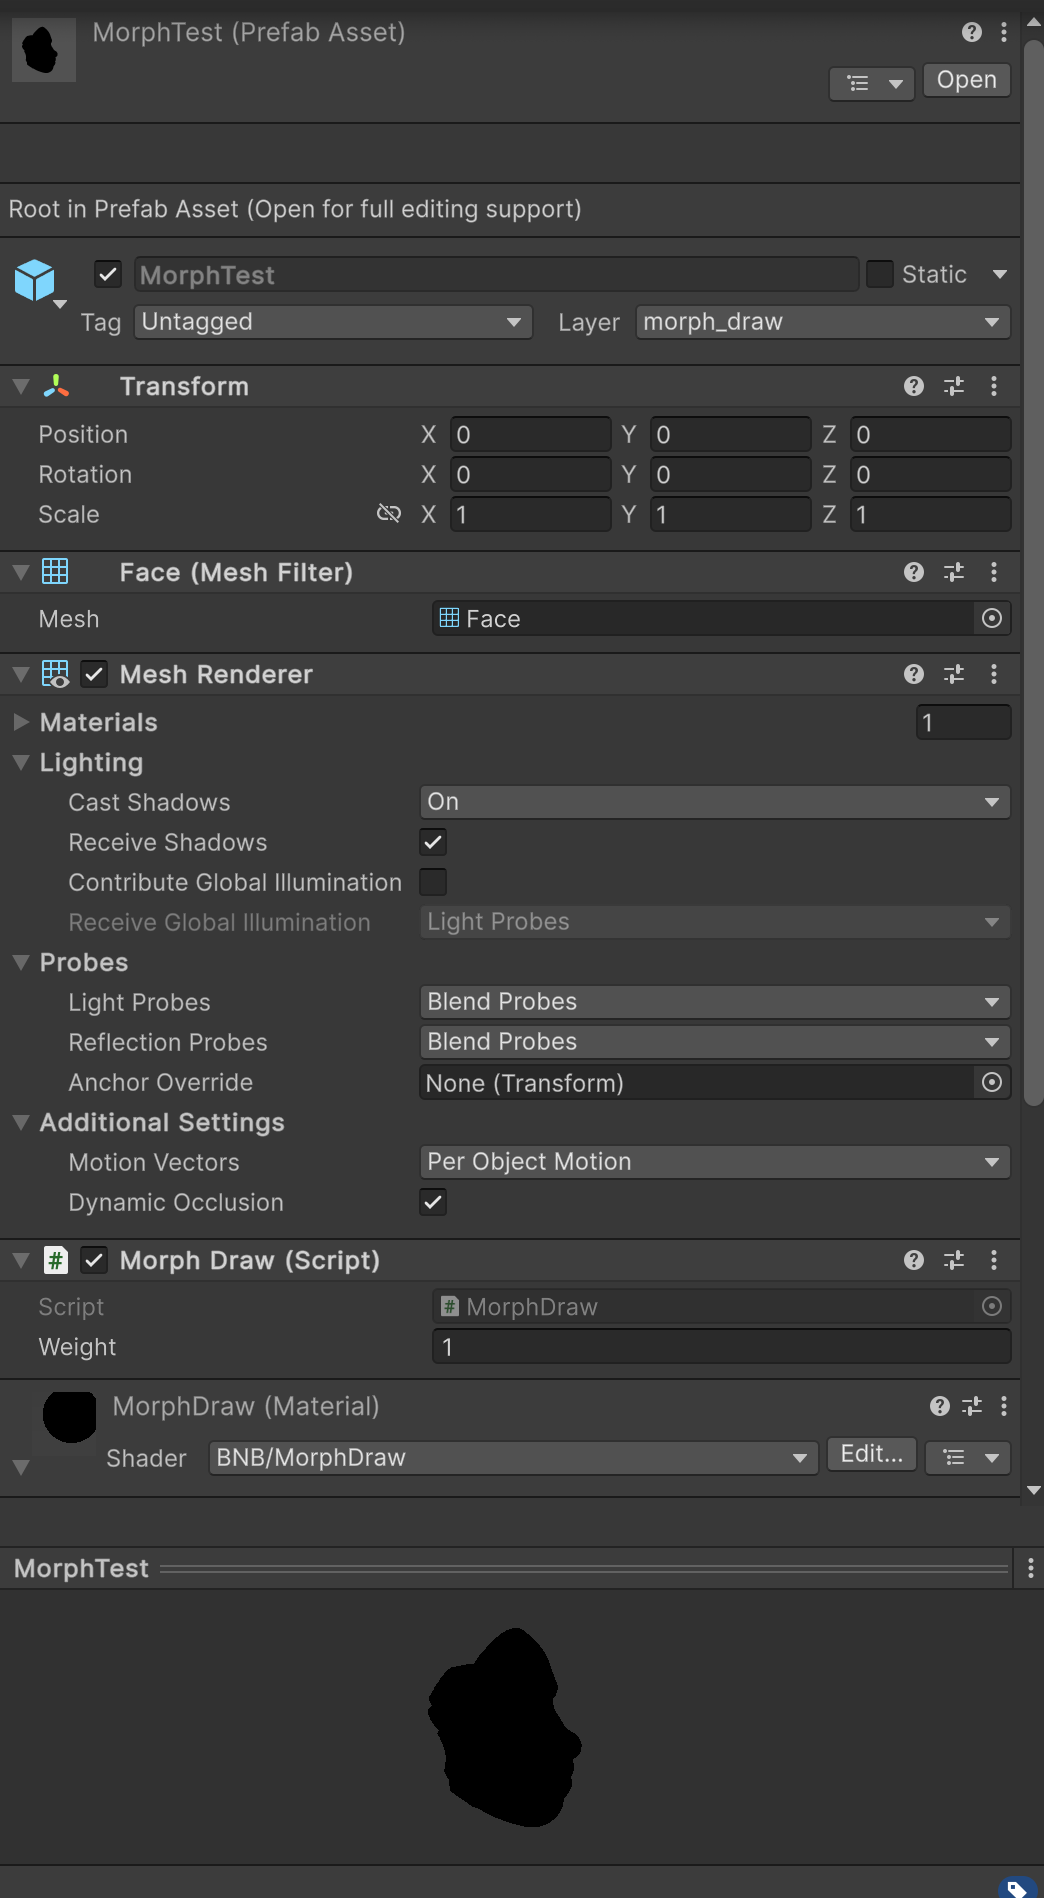
UV Morphing
This shape morphs face mesh with the mesh provided by user.
You can find a basic example of a uv morphing shape here platform/unity/BanubaSdk/Assets/BanubaFaceAR/FeatureMorphing/effect/MorphTest.prefab
Components:
- MeshRenderer with the mesh of morph shape
- script:
MorphDraw.cs. Updates material properties. - material:
MorphDraw.mat.
UV Morph draw shapes required Enable UV Draw and Enable Static Pos in
Faces Controller
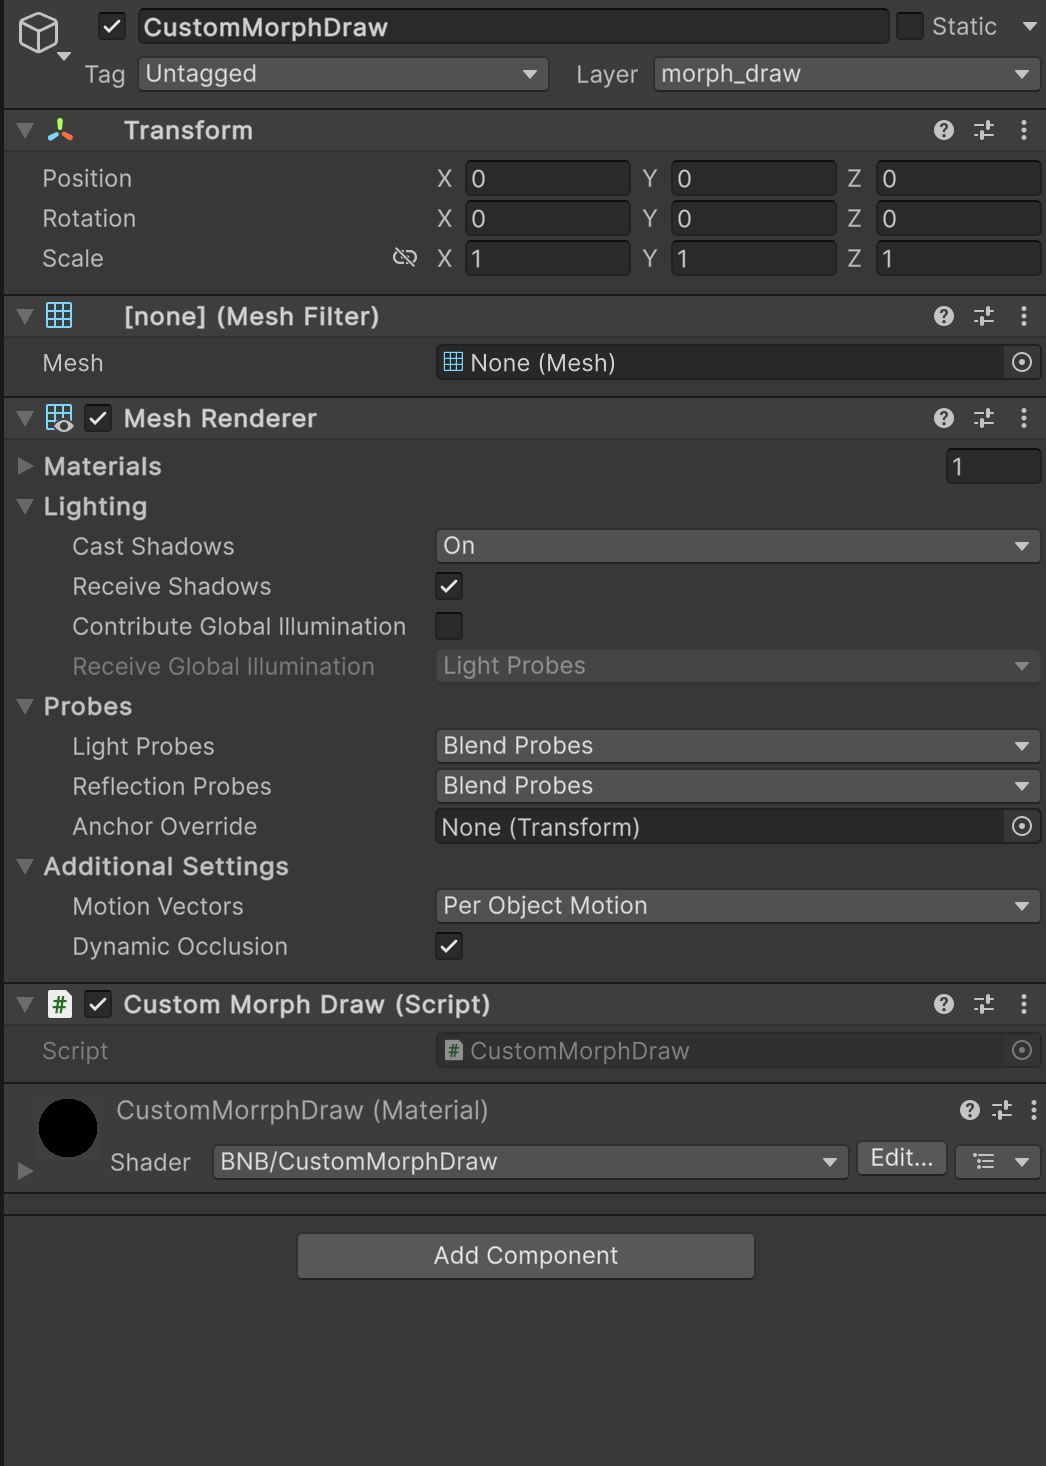
Custom Morphing
A ready-to-use Morph Shape with 28 parts of face that can be changed in the runtime.
Components:
- MeshRenderer with the mesh of morph shape
- script:
CustomMorphDraw.cs. Updates material properties. - material:
CustomMorphDraw.mat.
Morphing Result Camera
Components:
- script:
Assets/BanubaFaceAR/FeatureMorphing/Scripts/MorphingPostEffect.cs - script:
Assets/BanubaFaceAR/BaseAssets/Scripts/CameraController.cs
It takes a Morphing result from the Morphing Draw Camera and applies morphing in the OnRenderImage event function
Morphing Example
You can find the basic example here:
Segmentation
Segmentation Feature
Components:
-
script:
Assets/BanubaFaceAR/FeatureSegmentation/Scripts/SegmentationFeature.csProperties:- Type - type of the segmentation feature
- Use Segmentation Shader - if enabled, uses the default segmentation shader located here
Assets/BanubaFaceAR/FeatureSegmentation/Shaders/Segmentation.shader - Plane - Camera Plain Reference
-
unityUI: Raw Image
Location: Assets/BanubaFaceAR/FeatureSegmentation/Prefabs/SegmentationFeature.prefab
A ready-to-use prefab with all segmentation features provided by Banuba SDK.
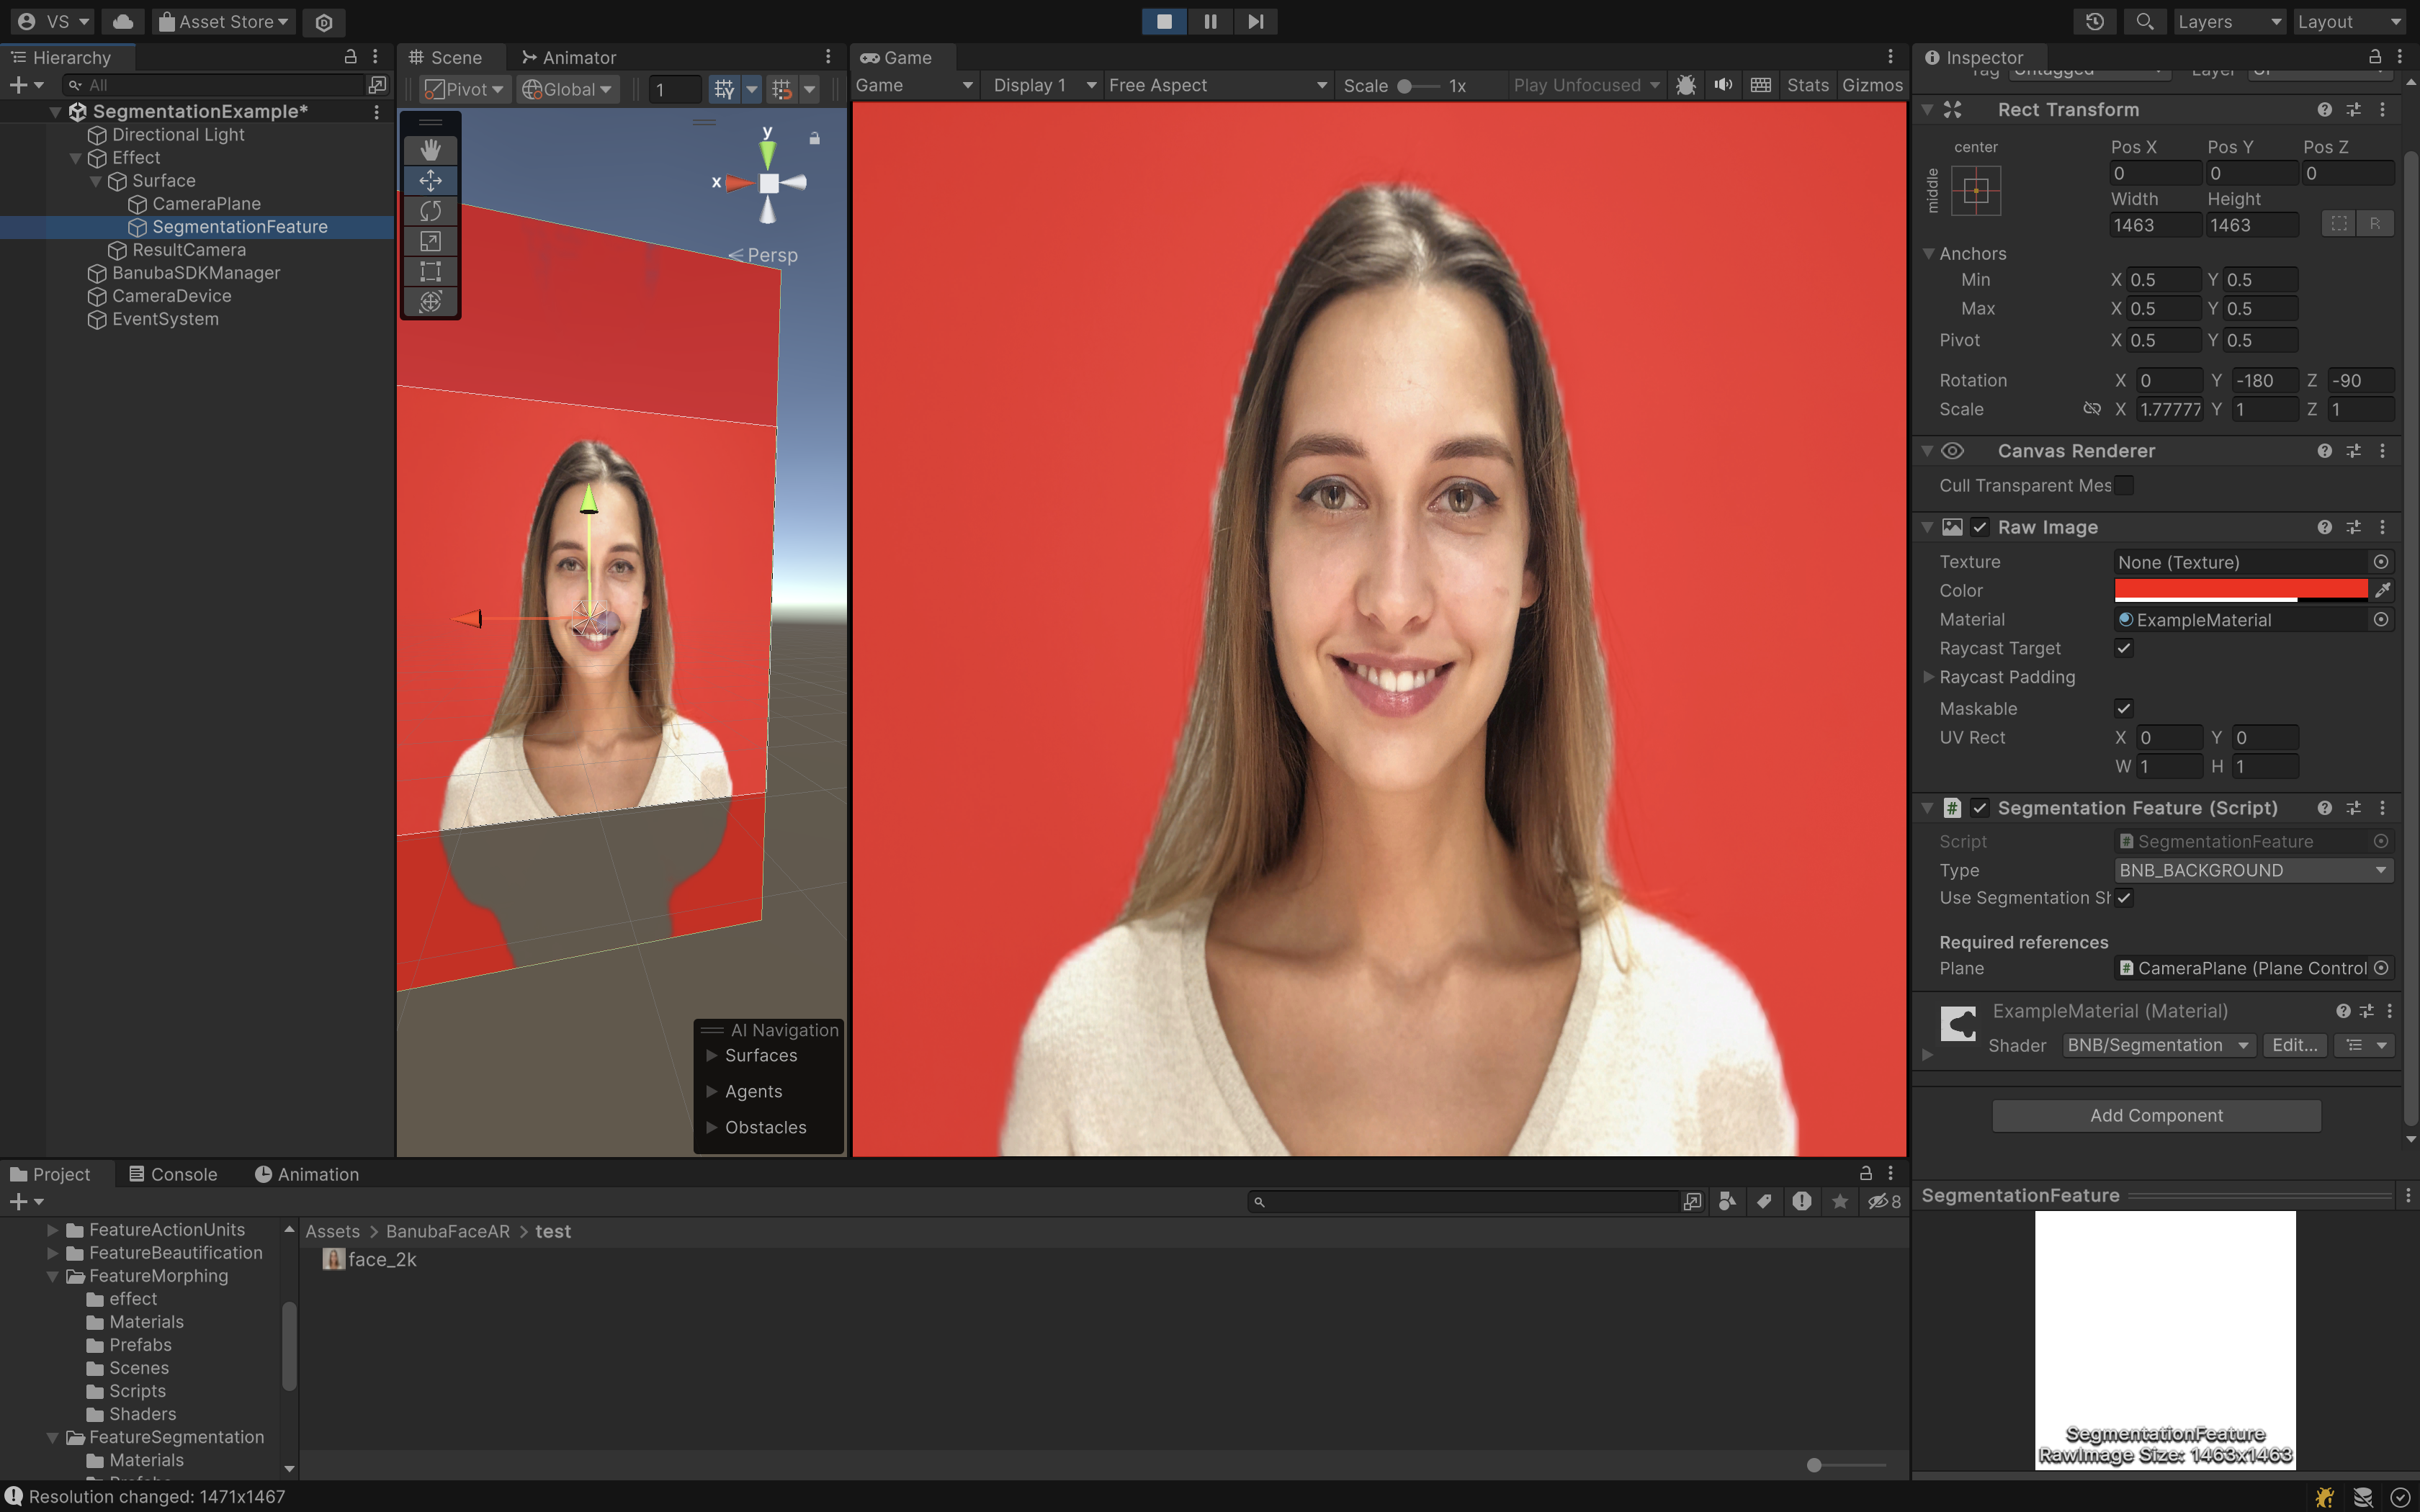
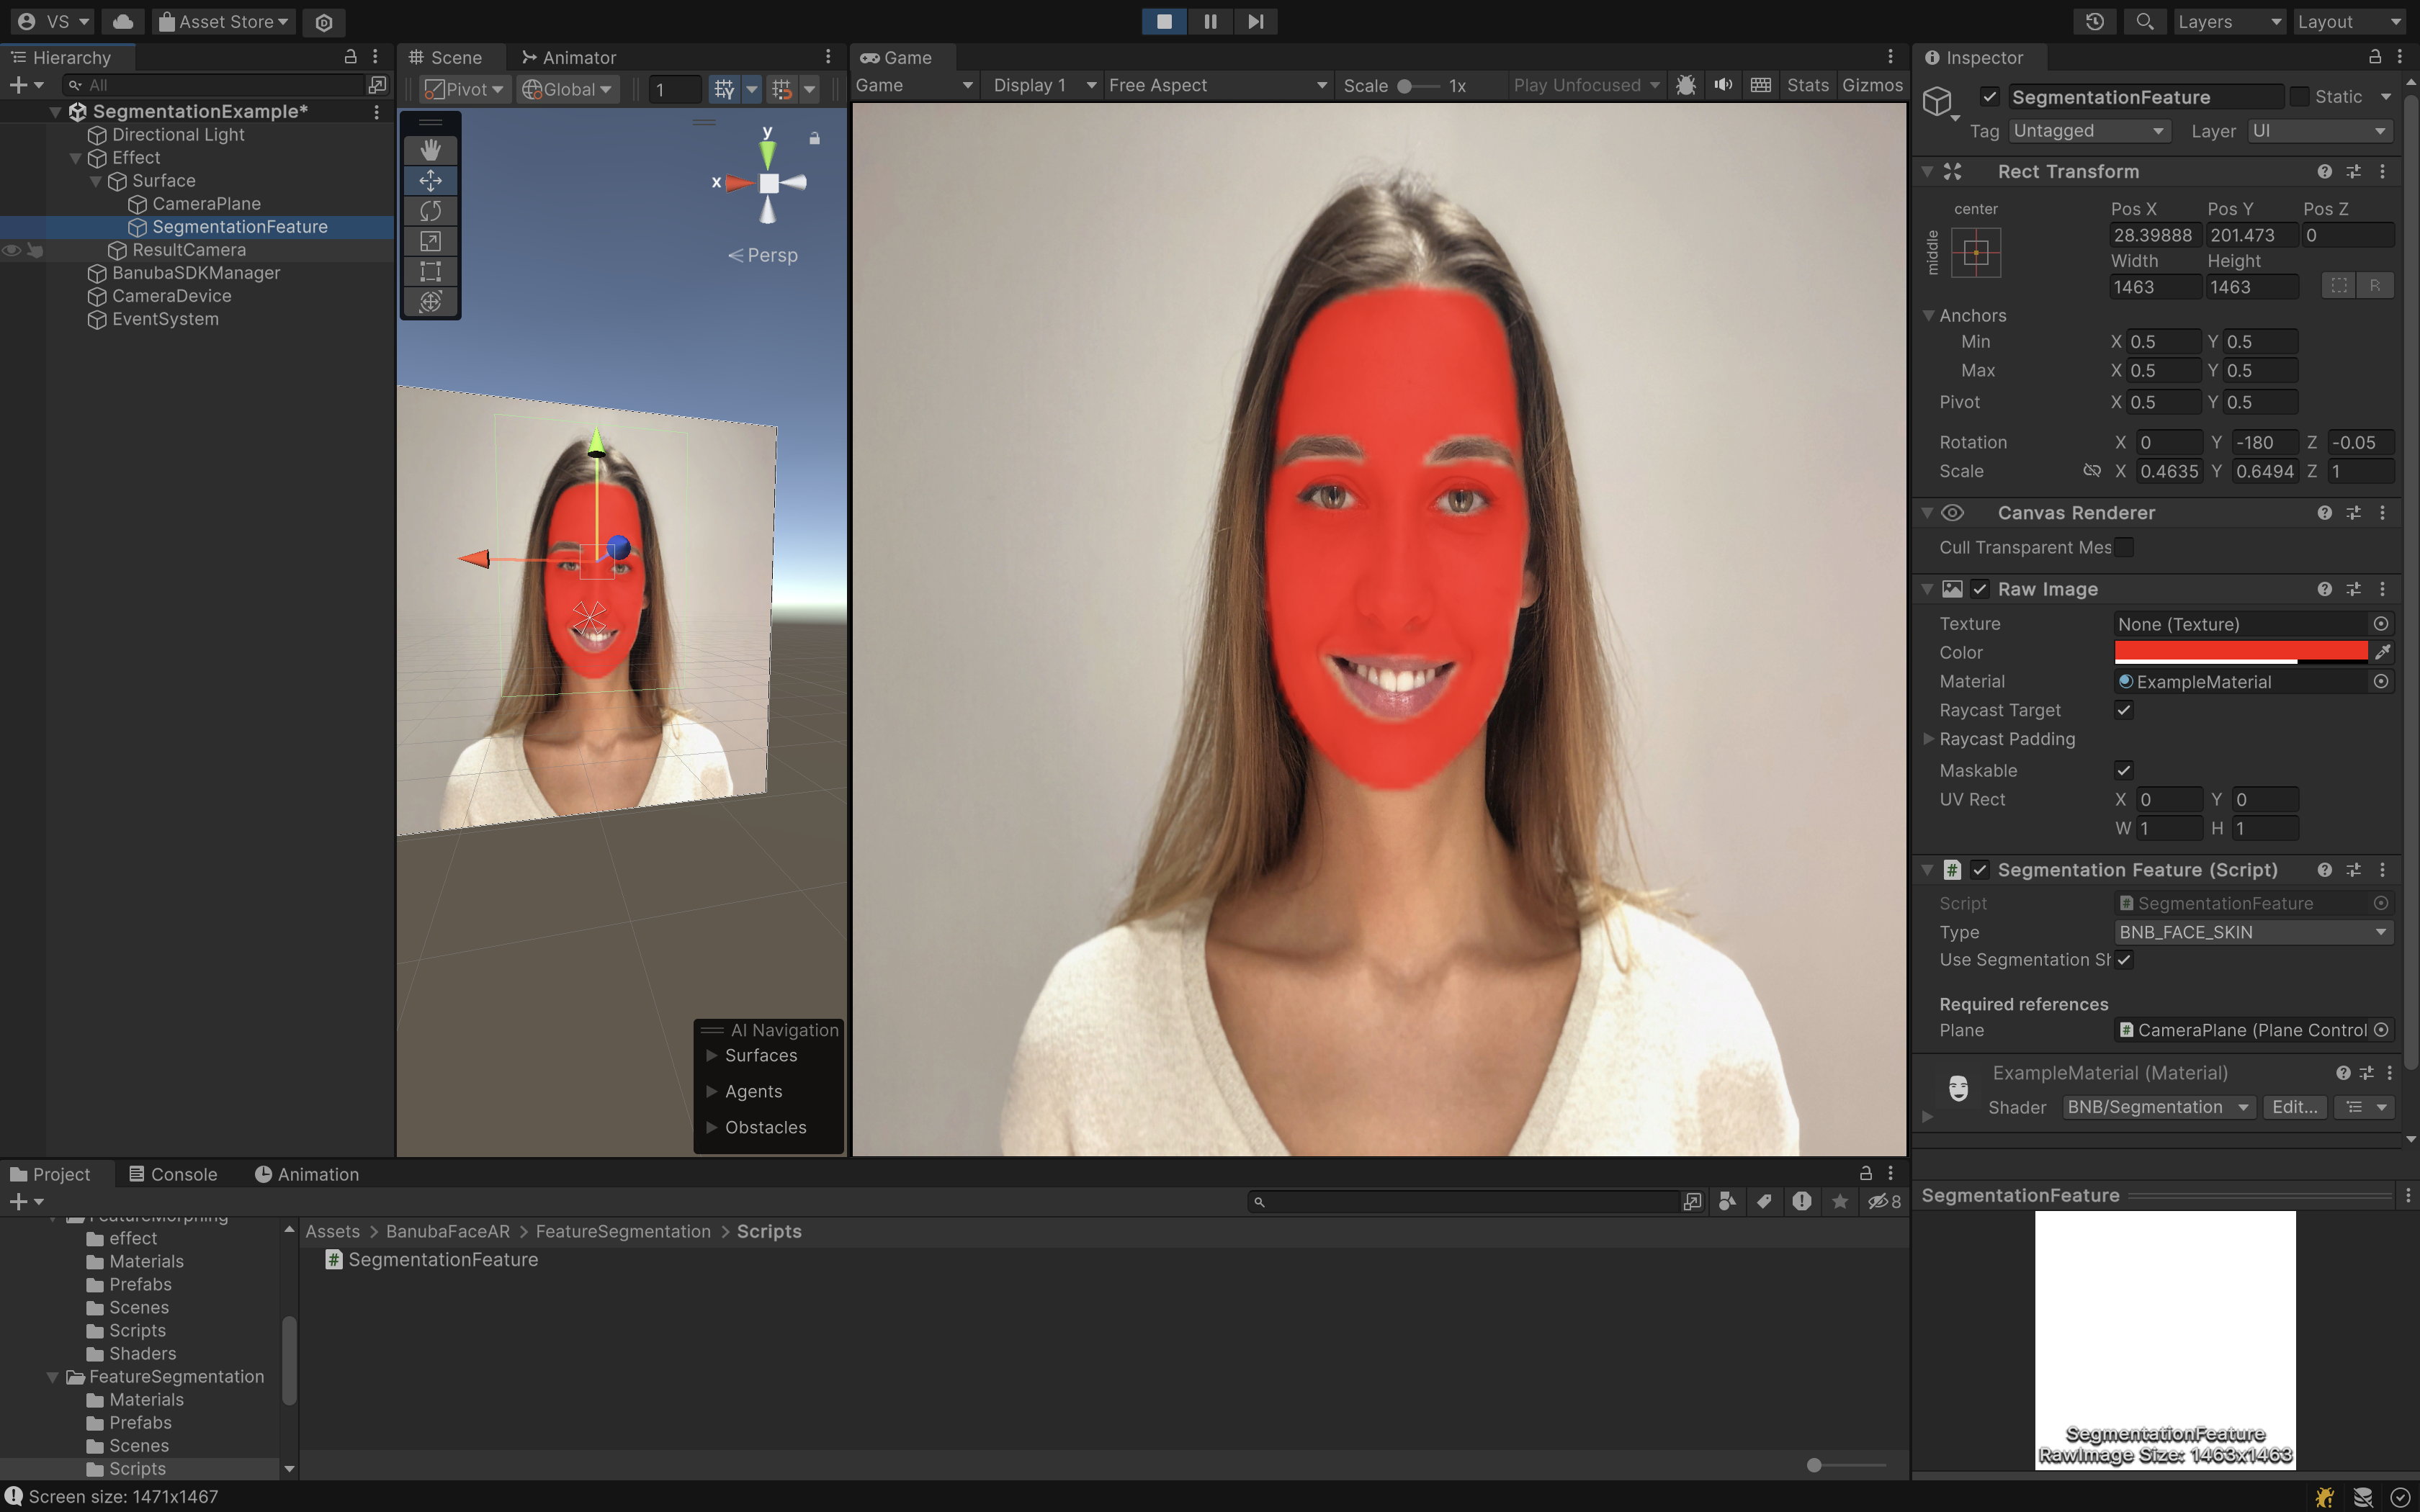
Segmentation Types:
public enum bnb_segm_type_t
{
    BNB_BACKGROUND = 0,
    BNB_FACE,
    BNB_HAIR,
    BNB_NECK,
    BNB_SKIN,
    BNB_LIPS,
    BNB_BROW_LEFT,
    BNB_BROW_RIGHT,
    BNB_EYE_PUPIL_LEFT,
    BNB_EYE_PUPIL_RIGHT,
    BNB_EYE_SCLERA_LEFT,
    BNB_EYE_SCLERA_RIGHT,
    BNB_EYE_IRIS_LEFT,
    BNB_EYE_IRIS_RIGHT,
    BNB_FACE_SKIN
}
Segmentation Example:
Background:
Face Skin:
MakeUp
How to add Makeup to your Effect
- Find
Makeup.prefabin Project window, drag it and attach to your effect in Hierarchy window.
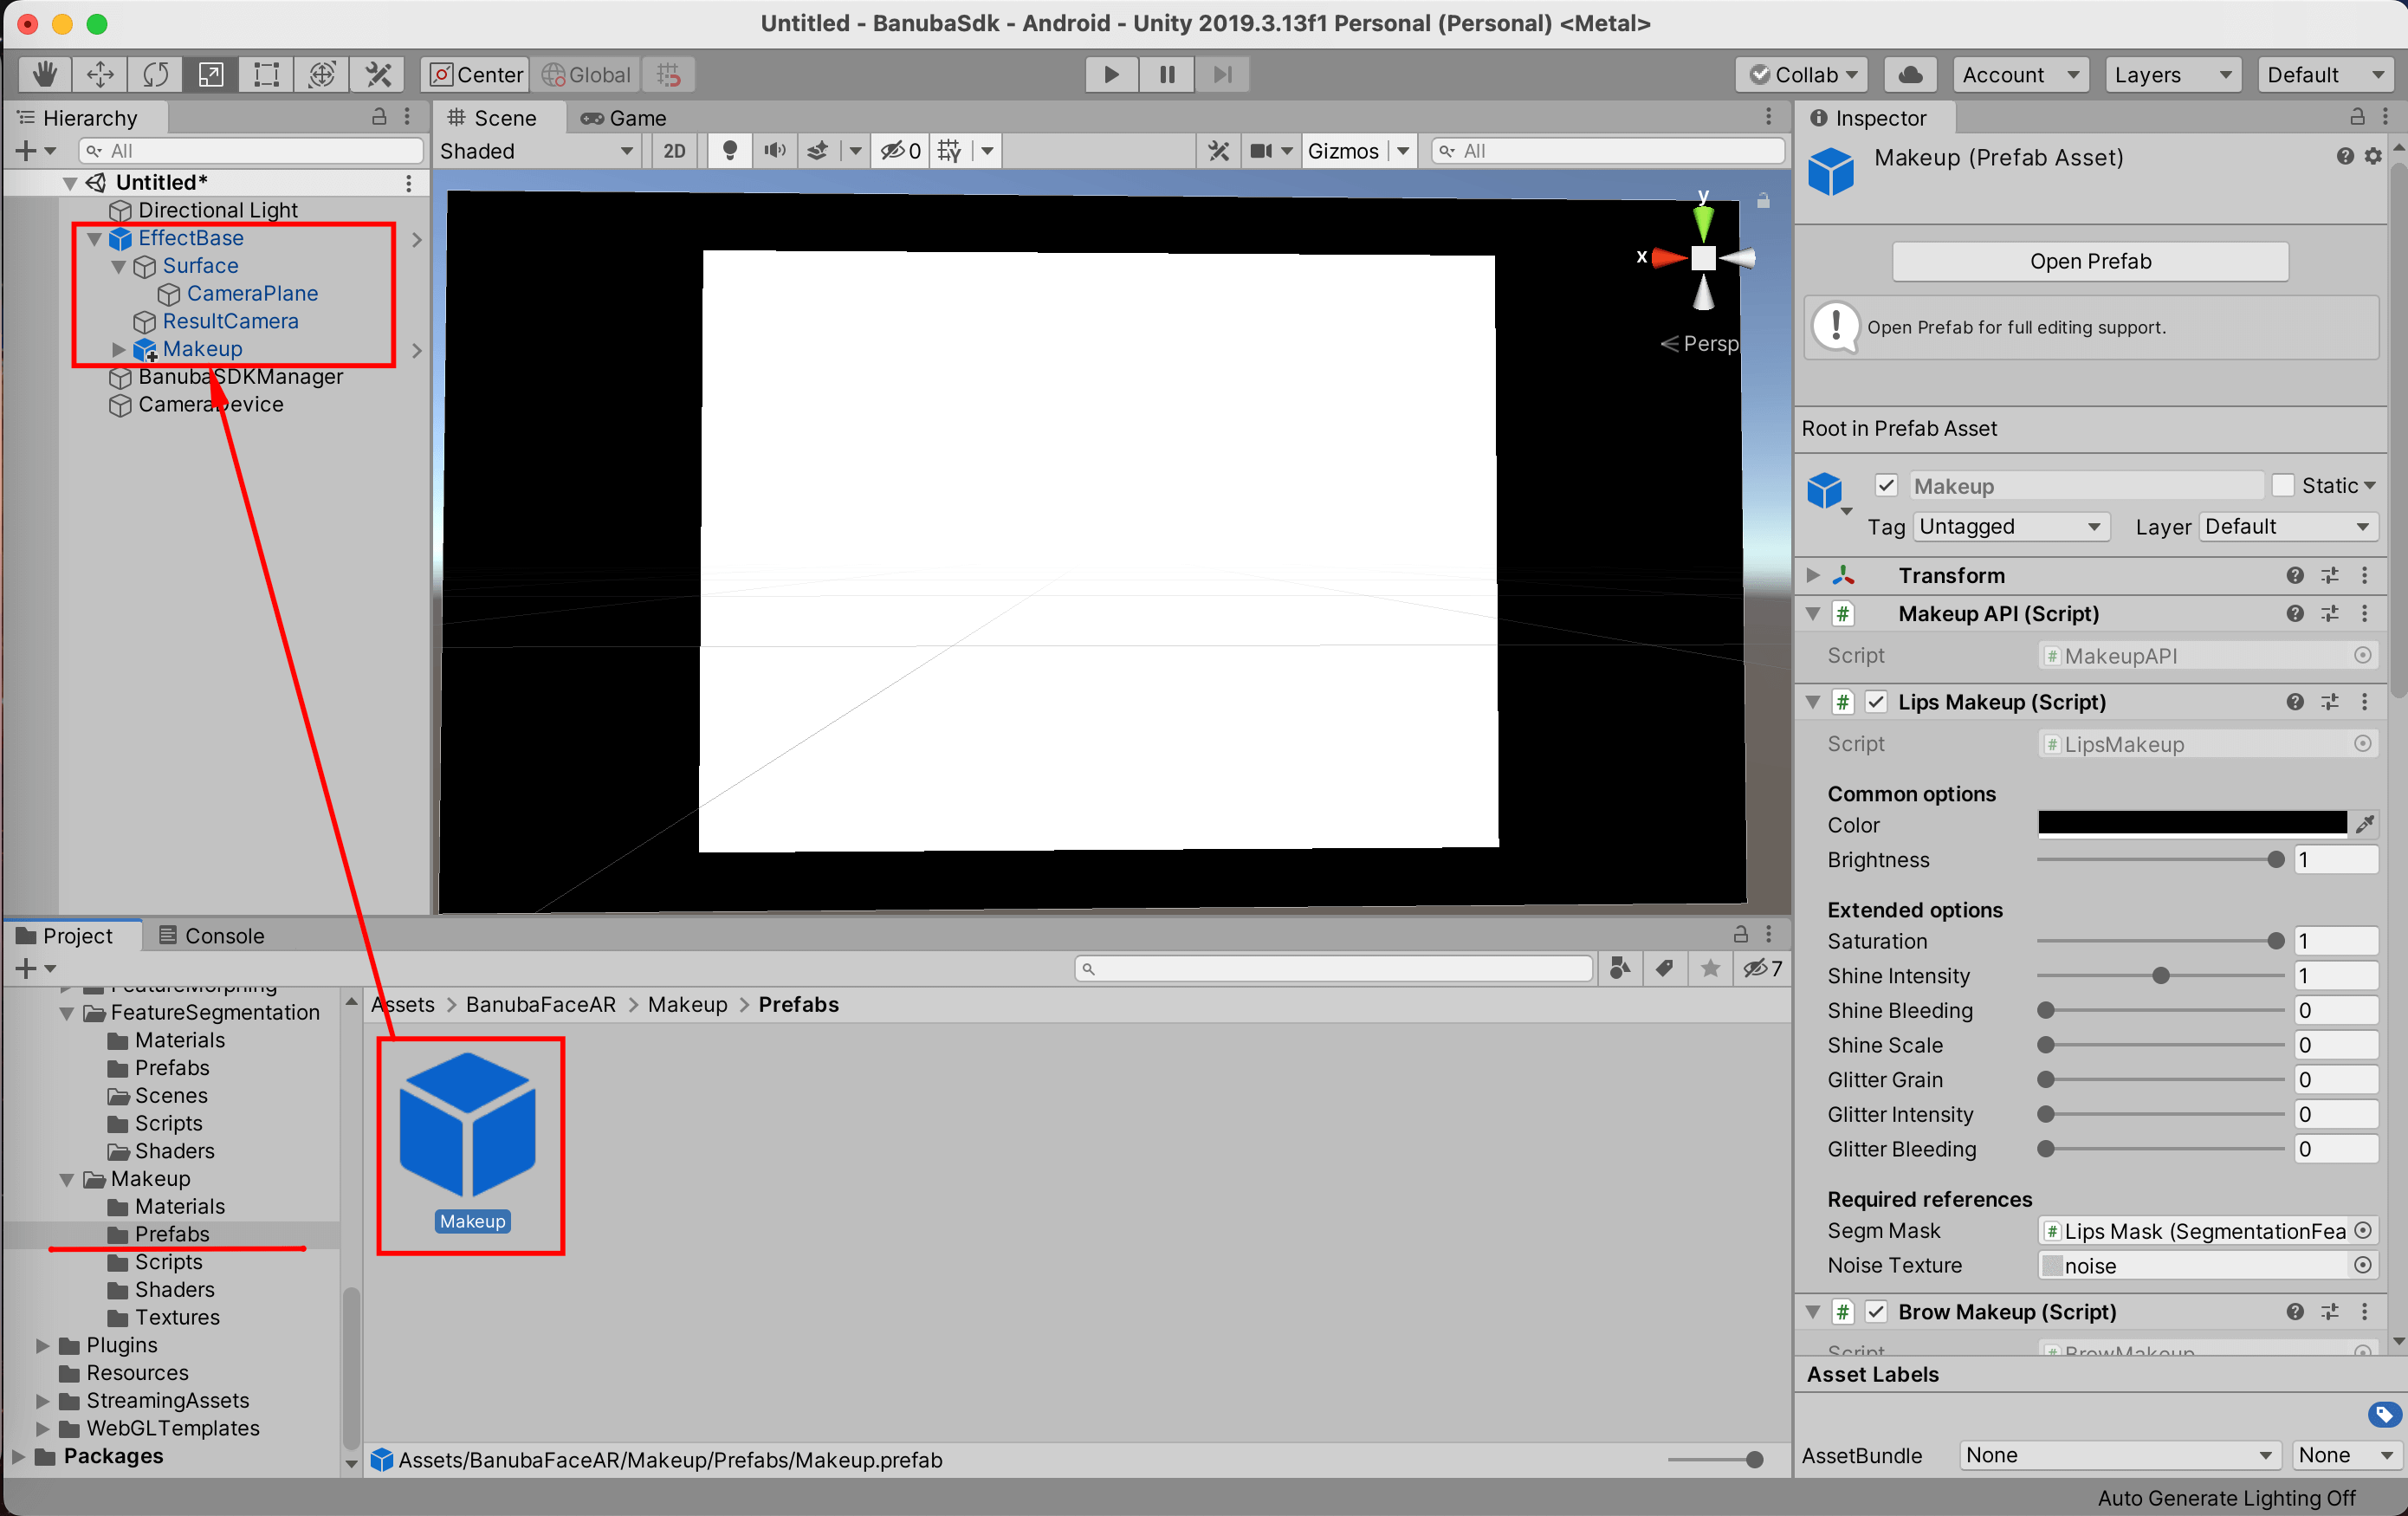
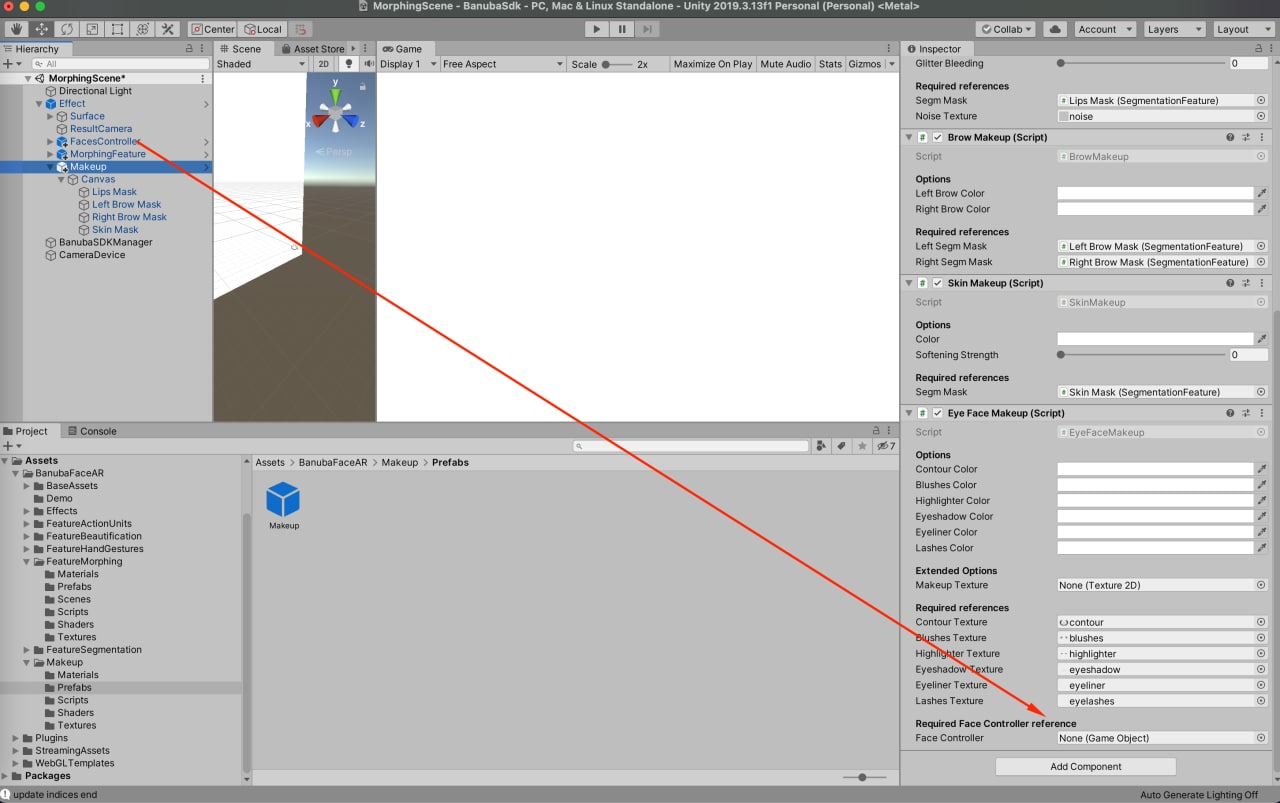
- Then you need to assign a reference of your effect's PlaneController component to each segmentation AR 3D Mask (SmoothCamera is not segmentation) under Canvas object by dragging a CameraPlane object from Hierarchy to a Plane field of a Segmentation Feature component. You can do it one by one, or just by selecting all of them in the Hierarchy and assigning reference to all of them at once as shown below.
- Add the required references for FacesController. If you haven't got FacesController in your current effect, you could find it here Assets/BanubaFaceAR/BaseAssets/Prefabs/FacesController.prefab and drag it into the effect root.
- Assign effect's ResultCamera to RenderCamera field on Canvas object.

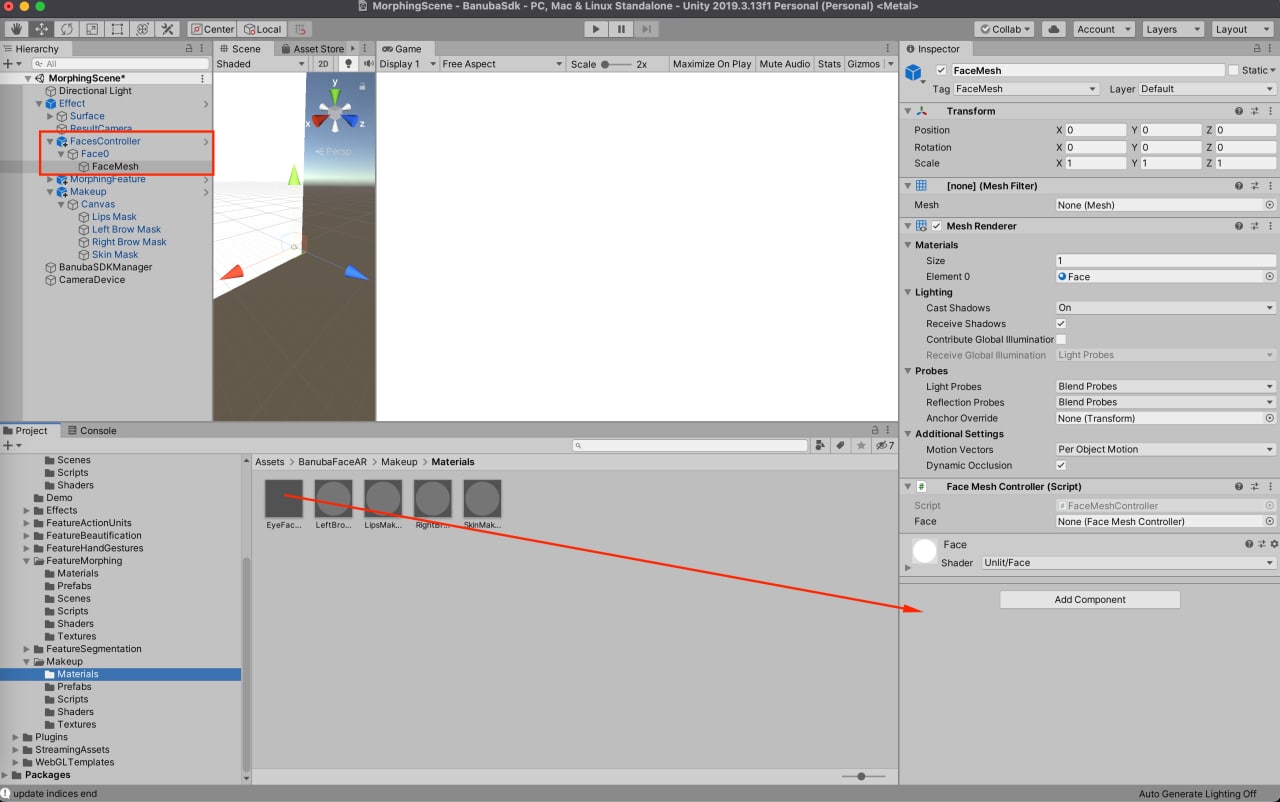
- Change the FaceMesh Material on Assets/BanubaFaceAR/Makeup/Materials/EyeFaceMakeup.mat:
- Makeup is ready!
How to use
After Makeup is added to your object, it's time to tweak some options. Each separate makeup feature is represented as a component on the Makeup object that provides you with different options to adjust. You can do it both from code and Inspector.
Tweak options from Inspector to see makeup in Editor Playmode
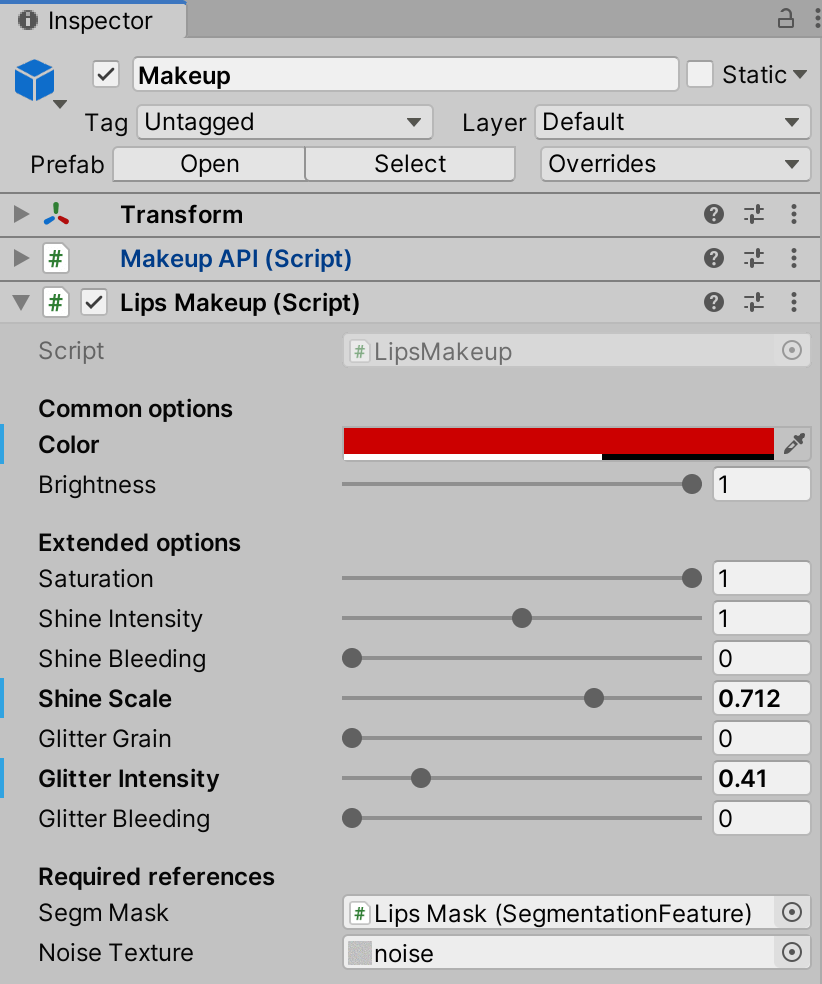
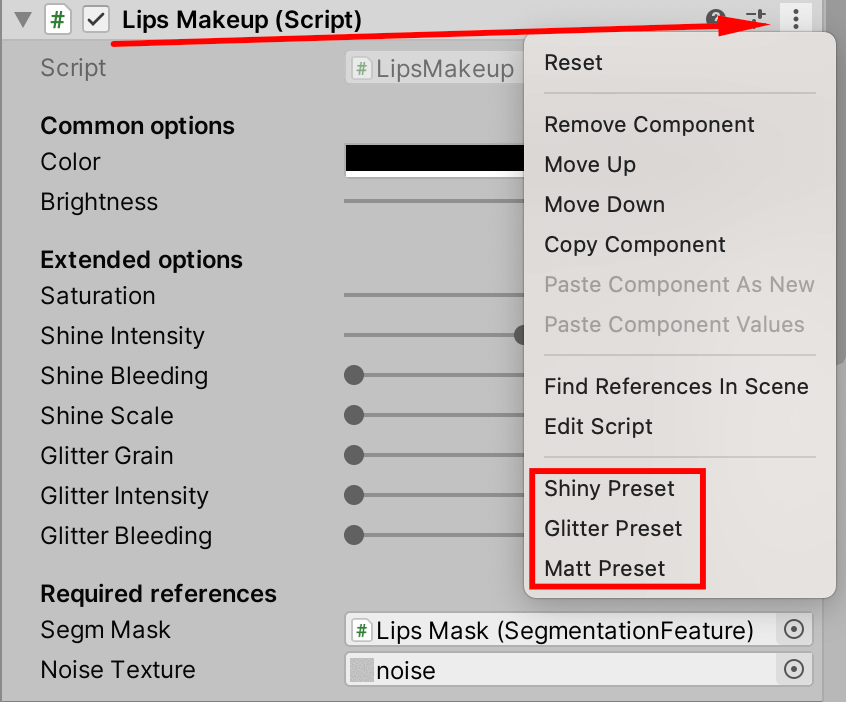
Lips makeup component has 3 option presets for aa particular lips look.
To apply them, find and click the button in the upper-right corner of the Lips Makeup component
window and choose the preset you want from the end of the list.
To access these options from the code at runtime, you can get a reference to MakeAPI component which stores references to all other makeup components.
MakeupAPI makeupAPI = makeupGameObject.GetComponent<MakeupAPI>();
makeupAPI.Lips.color = new Color(0.8f, 0.1f, 0, 0.6f);
makeupAPI.Lips.brightness = 0.9f;
makeupAPI.Skin.softeningStrength = 1;
Adjusting Makeup from code
If you want to completely disable or enable a particular makeup
feature, just change the state of the MonoBehaviour's enabled property.
makeupAPI.Skin.enabled = false; // now Skin makeup is completely disabled
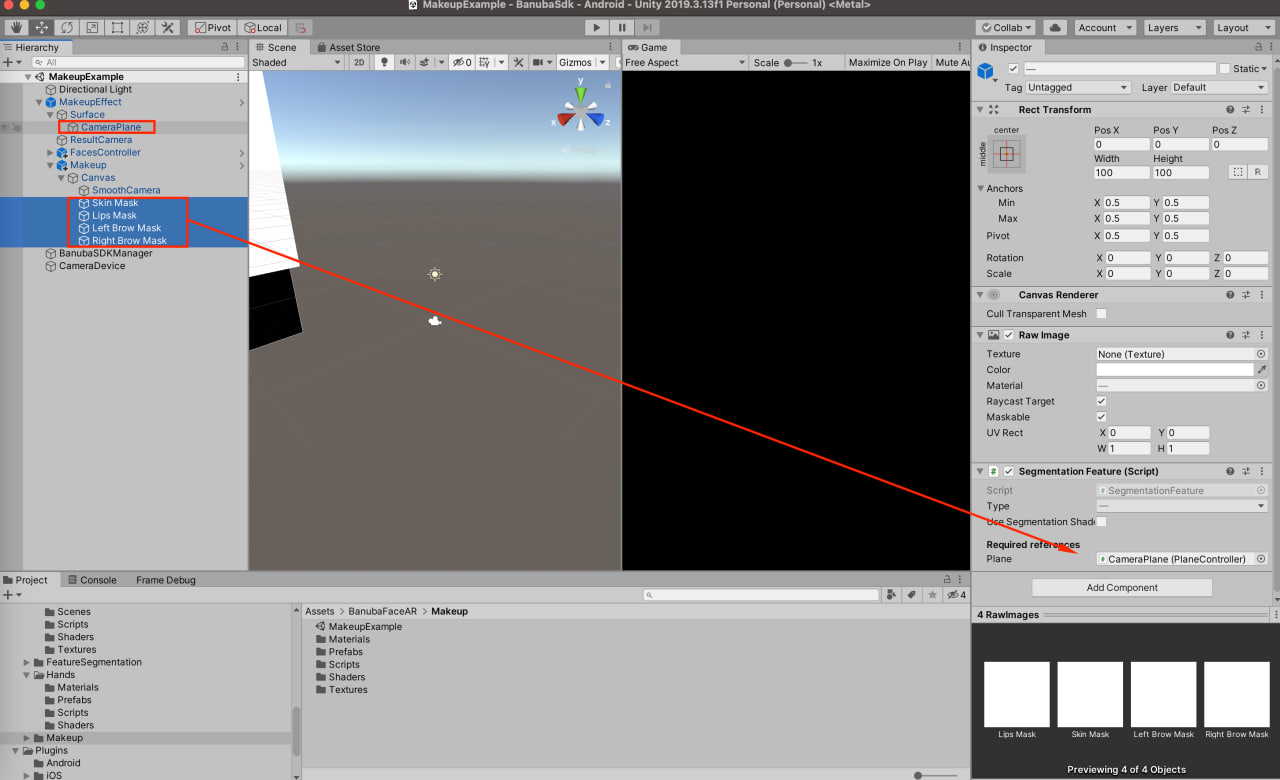
Makeup example scene
Banuba Unity plugin provides an example scene with Makeup effect.
Everything is already set up. Find and open MakeupExample.unity
scene under Assets => BanubaFaceAR => Makeup. Click Play button and see how it works!
Hand skeleton
Hand skeleton feature allows you to detect and render hand skeleton 2D.
- Enable Hand skeleton feature with BanubaSDKBridge.bnb_recognizer_insert_feature function.
// var recognizer = BanubaSDKManager.instance.Recognizer
// ...
var featuresId = BanubaSDKBridge.bnb_recognizer_get_features_id();
BanubaSDKBridge.bnb_recognizer_insert_feature(recognizer, featureId.hand_skeleton, out var error);
- Get the detected hand with BanubaSDKBridge.bnb_frame_data_get_hand function.
// frameData = BanubaSDKBridge.bnb_recognizer_process_frame_data(..., frameData, ...)
/// ...
var error = IntPtr.Zero;
var hand = BanubaSDKBridge.bnb_frame_data_get_hand(frameData, Screen.height, Screen.height, BanubaSDKBri, bnb_rect_fit_mode_t, bnb_fit_height, out error);
Utils.CheckError(error);
- bnb_hand_data_t contains landmarks for hand skeleton, transformation for the landmarks and current detected gesture(For gesture detecting see Hand Gestures section). Apply these landmarks as vertices of you mesh.
[StructLayout(LayoutKind.Sequential)]
public struct bnb_hand_data_t
{
    public bnb_hand_gesture_t gesture;
    public int vertices_count;
    public IntPtr vertices;

    [MarshalAs(UnmanagedType.ByValArray, SizeConst = 16)]
    public float[] transform;
};
How to add and use the Hand gestures feature
With the Unity Face AR Hand Gestures feature you can get and use hand gestures triggers in your app.
At the the moment, our algorithms are able to recognize 5 hand gestures:
- Like 👍
- Ok 👌
- Palm ✋
- Rock 🤘
- Victory/Peace ✌️
- Enable the Hand gestures feature with the BanubaSDKBridge.bnb_recognizer_insert_feature function.
// var recognizer = BanubaSDKManager.instance.Recognizer
// ...
var featuresId = BanubaSDKBridge.bnb_recognizer_get_features_id();
BanubaSDKBridge.bnb_recognizer_insert_feature(recognizer, featureId.hand_gestures, out var error);
NOTE: featureId.hand_gestures always enables featureId.hand_skeleton.
- Get this frame's detected gesture with BanubaSDKBridge.bnb_frame_data_get_gesture function.
// frameData = BanubaSDKBridge.bnb_recognizer_process_frame_data(..., frameData, ...)
/// ...
var gesture = BanubaSDKBridge.bnb_frame_data_get_gesture(frameData, out var error);
Example prefab and script
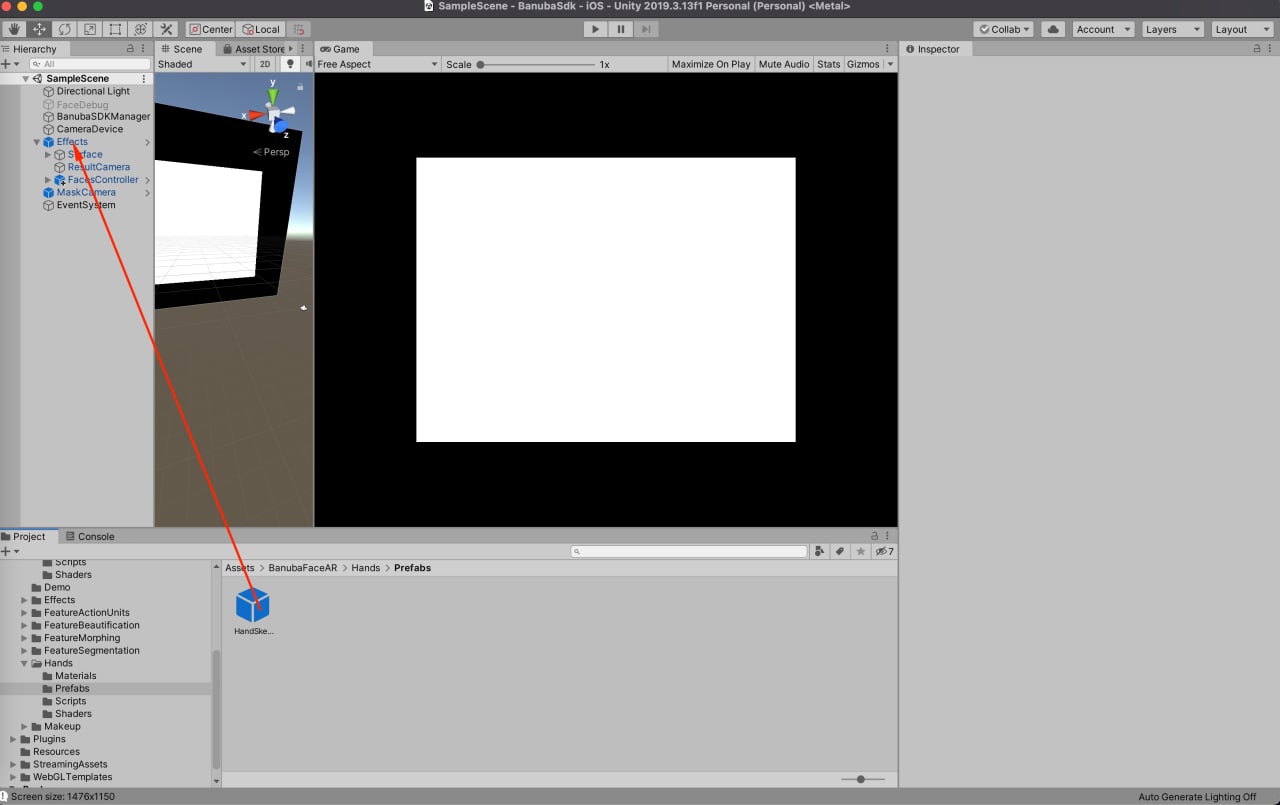
You can find HandSkeleton.prefab example prefab under Assets -> BanubaFaceAR -> Hands -> Prefabs. It has an attached HandSkeleton.cs component that contains all needed logic to enable and use hand skeleton and gestures.
-
Drop the prefab into scene.
-
Add render camera reference for the HandSkeleton.prefab.
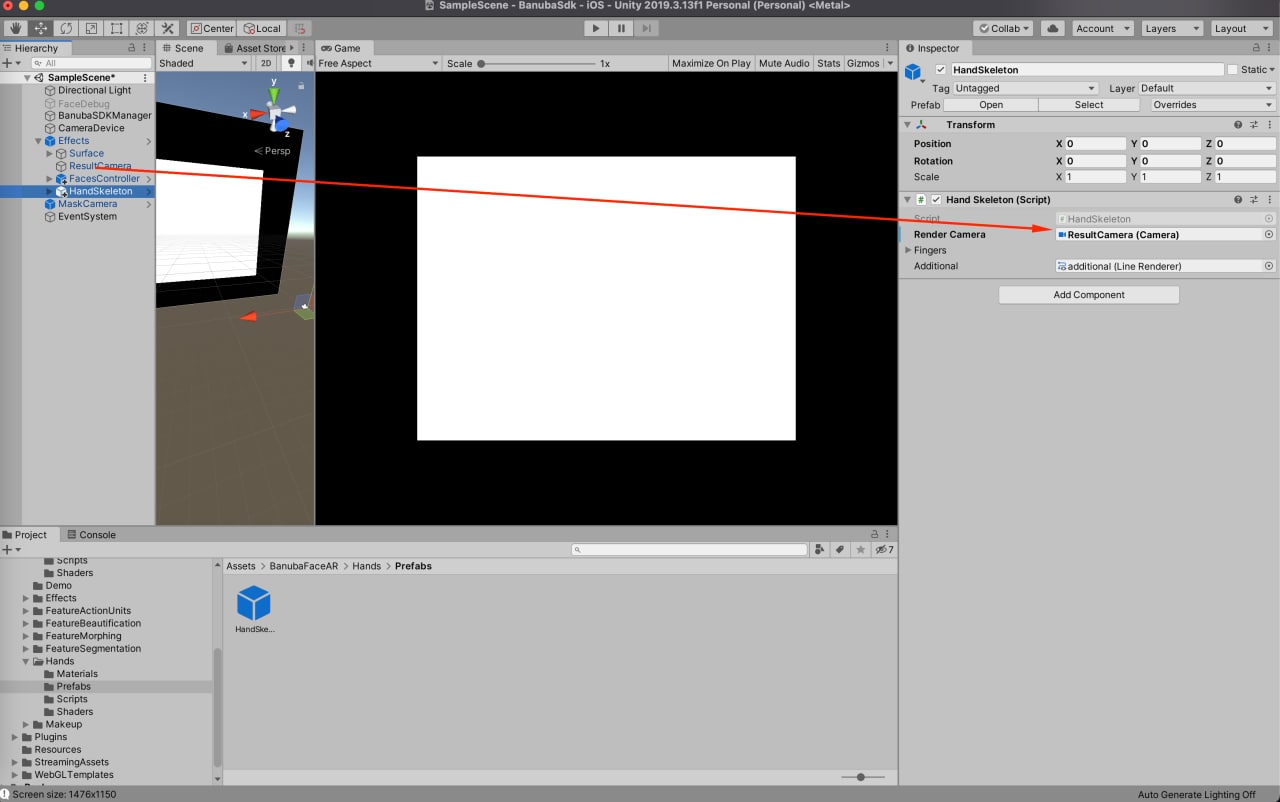
-
Hit Play to see how it works!