# API Overview
[View as Markdown](https://docs.banuba.com/far-sdk/tutorials/development/api_overview.md)[Open in ChatGPT](https://chatgpt.com/?q=Read%20https%3A%2F%2Fdocs.banuba.com%2Ffar-sdk%2Ftutorials%2Fdevelopment%2Fapi_overview.md%20\(API%20Overview\)%20and%20help%20me%20with%20it%20in%20my%20Banuba%20Face%20AR%20SDK%20project.)[Open in Claude](https://claude.ai/new?q=Read%20https%3A%2F%2Fdocs.banuba.com%2Ffar-sdk%2Ftutorials%2Fdevelopment%2Fapi_overview.md%20\(API%20Overview\)%20and%20help%20me%20with%20it%20in%20my%20Banuba%20Face%20AR%20SDK%20project.)Install tools
* iOS
* Android
* Web
* Desktop
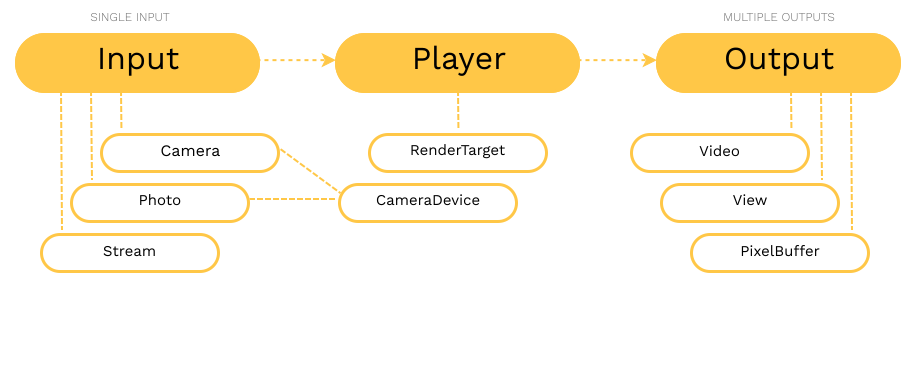
**Banuba SDK** for **iOS** can be divided into three main entities: `Input`, `Player` and `Output`. The plethora of input options multiplied by the plethora of output options covers many use cases.
## Input[](#input "Direct link to Input")
Processes frames from one of the producers:
* `Camera` - a real-time `CameraDevice` feed
* `Photo` - an image from the gallery or a photo taken from `CameraDevice`
* `Stream` - a frames sequence from the *WebRTC* stream or any other provider
* Custom - your own implementation for the `Input` protocol
## Player[](#player "Direct link to Player")
Allows to `use` different data inputs like `Camera` feed or `Photo`, to apply an **effect** on top of it and to `use` several outputs like `View` and `Video` file simultaneously.
The `Effect` component makes up an essential part of the SDK usage. The **effect** is represented as a folder with scripts and resources and can be loaded with the `load` method.
Supports the following rendering modes:
* `loop` *(default)* - render in the display-linked loop with the defined FPS
* `manual` - render manually by calling the `render` method
## Output[](#output "Direct link to Output")
Presents a rendered frame onto one of the available surfaces:
* `View` - on screen presentation
* `Frame`, `PixelBuffer`, `PixelBufferYUV` - in memory presentation
* `Video` - in video file presentation
* Custom - your own implementation for the `Output` protocol
## CameraDevice[](#cameradevice "Direct link to CameraDevice")
Accesses the device's camera to generate a feed of frames in real time or takes high-quality photos.
By default, tracks UI orientation to properly manage frame rotation.
## RenderTarget[](#rendertarget "Direct link to RenderTarget")
Manages a `CALayer` object with a `Metal` context and provides offscreen rendering for the `Player` and presenting for the `Output`.
## Use cases[](#use-cases "Direct link to Use cases")
Common use cases and relevant samples are described in [this repository](https://github.com/Banuba/banuba-sdk-ios-samples).
tip
See more use cases in [Samples](/far-sdk/tutorials/development/samples.md).
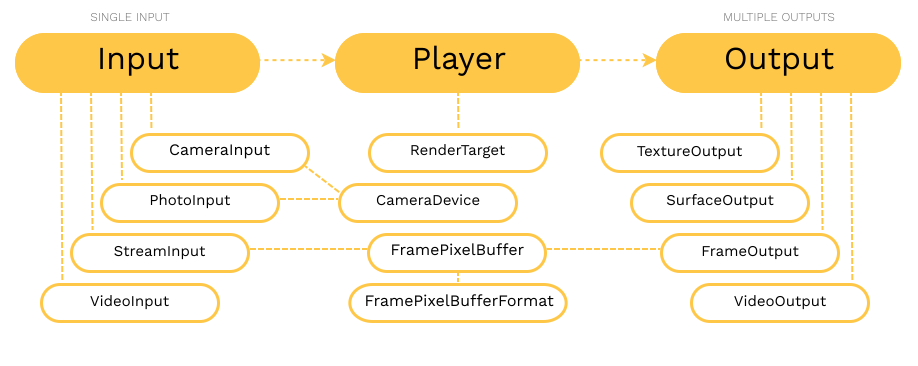
**Player API** is a set of classes and methods that help facilitate and speed up the integration of the Banuba SDK into applications. The **Player API** concept distinguishes three main entities: **Input**, **Player**, and **Output**.
Basic **Player API** packages:
* `com.banuba.sdk.input` — all the classes responsible for the input data, the Input entity.
* `com.banuba.sdk.player` — the rendering thread and the `Player`, the Player entity.
* `com.banuba.sdk.output` — all the classes responsible for the output data, the Output entity.
* `com.banuba.sdk.frame` — the pixel buffer used for both input and output.
## Input[](#input "Direct link to Input")
**Input** receives frames from a camera, image, or user input and provides them to the `Player`. The `Player` can only work with one Input at a time.
* `CameraInput` — this class provides frames from the front or rear camera in real time.
* `ProtoInput` — this class provides frames as photos taken by the camera or loaded from a file.
* `StreamInput` — this class provides user frames from user data.
* `VideoInput` — this class provides frames from a video file.
## Player[](#player "Direct link to Player")
The **Player** class requests frames from **Input**, then processes these frames and passes the results to one or more **Outputs**. By default, frame processing works automatically. Optionally, you can enable on-demand processing.
## Output[](#output "Direct link to Output")
**Output** receives the result of the work from the **Player** and renders it to the surface or a texture, writes it into a file, or provides the user with frames in a supported format.
* `FrameOutput` — provides the user with data in the form of a buffer of pixels.
* `SurfaceOutput` — this class renders frames to the `SurfaceView`.
* `TextureOutput` — this class renders frames to the `TextureView`.
* `VideoOutput` — this class writes frames to a video file.
## Input and Output of user data[](#input-and-output-of-user-data "Direct link to Input and Output of user data")
The **Input** and the **Output** can operate on a pixel buffer.
* `FramePixelBuffer` — provides access to an array of pixels as a byte buffer. In the `StreamInput` class, it is used as the input data buffer, and in the `FrameOutput` class, it is used as the output data buffer.
* `FramePixelBufferFormat` — pixel buffer format can be one of: `RGBA`, `I420_BT601_FULL`, `I420_BT601_VIDEO`, `I420_BT709_FULL` or `I420_BT709_VIDEO`.
## Use cases[](#use-cases "Direct link to Use cases")
### CameraDevice[](#cameradevice "Direct link to CameraDevice")
The camera device is associated with the device's physical camera. All camera settings are made using this class.
```
// Variable declaration somewhere inside the activity
private val cameraDevice by lazy(LazyThreadSafetyMode.NONE) {
CameraDevice(requireNotNull(this.applicationContext), this@MainActivity)
}
...
// Somewhere in the initialization code
/* You can change the camera settings at any time as follows. */
cameraDevice.configurator
.setLens(CameraDeviceConfigurator.LensSelector.BACK) /* Set back camera as input */
.setVideoCaptureSize(CameraDeviceConfigurator.SD_CAPTURE_SIZE) /* Video capturing size 640, 480 */
.setImageCaptureSize(CameraDeviceConfigurator.HD_CAPTURE_SIZE) /* Image capture size 1280, 720 */
.commit() /* You must call this method to apply the new settings. */
/* But if you're happy with the camera's default settings, then you can safely
skip manual settings. */
/* We start the camera and then player starts taking frames */
/* You must obtain permission before calling the cameraDevice.start() method. */
cameraDevice.start()
...
// Somewhere in the interruption code
/* After this method, the camera will stop capturing frames and transmitting
them to player */
cameraDevice.stop()
```
### CameraInput[](#camerainput "Direct link to CameraInput")
Allows to receive and process frames from the `CameraDevice`. The `Player` will only process the most recently received frame, all other frames will be discarded. Frames will be processed in online mode.
```
// Somewhere in the initialization code
/* There is no need to create a variable for this class since this class is only used
to transfer frames from the camera to the player. But it is necessary that cameraDevice
is created */
player.use(CameraInput(cameraDevice), ...)
```
### PhotoInput[](#photoinput "Direct link to PhotoInput")
Allows you to process photos from the `CameraDevice`, from the Android [`Bitmap`](https://developer.android.com/reference/android/graphics/Bitmap), from the Android [`Image`](https://developer.android.com/reference/android/media/Image), or from the [`FramePixelBuffer`](#framepixelbuffer) with or without a given orientation and mirroring. The photo will be processed in the offline mode.
```
// Somewhere in the image processing code
val photoInput = PhotoInput()
player.use(photoInput, ...)
/* cameraDevice must be created and started before taking a photo */
photoInput.take(cameraDevice, object: CameraDevice.IErrorOccurred {
override fun onError(exception: Exception) {
/* Did an error occur? Now we just ignore it */
}
})
```
### StreamInput[](#streaminput "Direct link to StreamInput")
Pushes the user data stream to the `Player`. User data can come from anywhere, for example, received over the network. Frames will be processed in online mode.
```
// Variable declaration
private val streamInput by lazy(LazyThreadSafetyMode.NONE) {
StreamInput()
}
...
// Somewhere in the initialization code
player.use(streamInput, ...)
...
// somewhere in the code when receiving the next frame
/* You can see an example of creating a FramePixelBuffer below
in section 1FramePixelBuffer */
val frame = FramePixelBuffer(...)
/* myFrameTimestampInNanoseconds - it is not necessary to put the timestamp,
you can always transmit 0. But if you use VideoOutput, then recording in the video file
will be based on the time that you put here. Be careful with the timestamp; note
that it must be transmitted in nanoseconds. */
streamInput.push(frame, myFrameTimestampInNanoseconds)
```
### VideoInput[](#videoinput "Direct link to VideoInput")
Used when you need to process a video file, all the frames will be processed sequentially one by one. Must be used with `MANUAL` player rendering. Supported video formats depend on the specific device and installed **Android** codecs. Frames will be processed in offline mode.
```
// Variable declaration
private val videoInput by lazy(LazyThreadSafetyMode.NONE) {
VideoInput()
}
...
// Somewhere in the initialization code
/* Asynchronous video file processing */
videoInput.processVideoFile(File("path_to/my_video.mp4"), object: VideoInput.IVideoFrameStatus {
override fun onStart() {
/* Start of video extraction */
/* We switch the player to the manual mode so that we can process the video file
frame by frame */
player.setRenderMode(Player.RenderMode.MANUAL)
}
override fun onFrame() {
/* The video frame was extracted and pushed to the player */
/* We call synchronous rendering so that the player has time to process the frame */
player.render()
}
override fun onError(throwable: Throwable) {
/* Did an error occur? Now we just ignore it */
}
override fun onFinish() {
/* Processing of the video file has completed. If there were any errors and
nothing was read from the video file, then this function is always called if
function onStart() was called. We also return the player to the previous
rendering mode */
player.setRenderMode(Player.RenderMode.LOOP)
}
})
...
// Somewhere in the interruption code
/* If processing the current video file is no longer needed, then call this method */
videoInput.stopProcessing()
```
### FramePixelBufferFormat[](#framepixelbufferformat "Direct link to FramePixelBufferFormat")
Pixel buffer format can be one of:
* `BPC8_RGBA` - 4 bytes per pixel, analogue of android type [`Bitmap.Config.ARGB_8888`](https://developer.android.com/reference/android/graphics/Bitmap.Config).
* `I420_BT601_FULL` - yuv i420 image encoded by standard bt601 full range.
* `I420_BT601_VIDEO` - yuv i420 image encoded by standard bt601 video range.
* `I420_BT709_FULL` - yuv i420 image encoded by standard bt709 full range.
* `I420_BT709_VIDEO` - yuv i420 image encoded by standard bt709 video range.
### FramePixelBuffer[](#framepixelbuffer "Direct link to FramePixelBuffer")
A wrapper for pixel images that can store images of different formats and provide convenient access to all image parameters.
example of creating RGBA FramePixelBuffer
```
/* The format BPC8_RGBA has a single plane of densely packed pixels */
val myWidth = 400 /* width of the image */
val myHeight = 300 /* height of the image */
val myPixelStride = 4 /* 4 because BPC8_RGBA format and the pixels are tightly packed */
val myRowStride = myWidth * myPixelStride /* Stride is bytes per row of pixels */
val myArrayOfPixels: ByteBuffer = ... /* array of pixels with RGBA data 400x300 pixels */
val frame = FramePixelBuffer(myArrayOfPixels,
intArrayOf(0 /* 0 because the pixels start from a zero byte in the buffer */),
intArrayOf(myRowStride),
intArrayOf(myPixelStride),
myWidth,
myHeight,
FramePixelBufferFormat.BPC8_RGBA
)
```
example of creating YUV FramePixelBuffer
```
/* You can read more about YUV format here:
https://learn.microsoft.com/en-us/windows/win32/medfound/recommended-8-bit-yuv-formats-for-video-rendering
*/
/* Any format I420_*** has a single plane of densely packed pixels */
val myWidth = 400 /* width of the image */
val myHeight = 300 /* height of the image */
val myArrayOfPixels: ByteBuffer = ... /* array of pixels with i420 data 400x300 pixels */
val myYPlanePixelStride = 1 /* 1 because i420 format and the pixels are tightly packed */
val myUPlanePixelStride = 1 /* 1 because i420 format and the pixels are tightly packed */
val myVPlanePixelStride = 1 /* 1 because i420 format and the pixels are tightly packed */
val myYPlaneRowStride = myWidth /* in this case the stride is equal to the width */
val myUPlaneRowStride = myWidth /* in this case the stride is equal to the width */
val myVPlaneRowStride = myWidth /* in this case the stride is equal to the width */
val myOffsetToYPlane = 0 /* plane Y starts from the beginning of buffer myArrayOfPixels */
val myOffsetToUPlane = myOffsetToYPlane + myYPlanePixelStride * myHeight
val myOffsetToVPlane = myOffsetToUPlane + myUPlanePixelStride * myHeight / 4
val frame = FramePixelBuffer(myArrayOfPixels,
intArrayOf(myOffsetToYPlane, myOffsetToUPlane, myOffsetToVPlane),
intArrayOf(myYPlaneRowStride, myUPlaneRowStride, myVPlaneRowStride),
intArrayOf(myYPlanePixelStride, myUPlanePixelStride, myVPlanePixelStride),
myWidth,
myHeight,
FramePixelBufferFormat.I420_BT601_FULL
)
```
### Player[](#player-1 "Direct link to Player")
The main class with which you can manage **Banuba SDK**, **effects** and the entire rendering process. Rendering in this class is done in a separate thread, the **render thread**.
```
// Variable declaration
private val player by lazy(LazyThreadSafetyMode.NONE) {
Player()
}
...
// Somewhere in the initialization code
/* Initialization of the Banuba SDK must occur before the player starts working,
otherwise there will be a crash indicating an error */
BanubaSdkManager.initialize(this, <#MY BANUBA CLIENT TOKEN#>);
/* cameraDevice and textureOutput must be created and declared before use */
/* In fact, you can specify more than one output as an output. The number of outputs
is not limited. But every additional one affects performance. If this is an output to
the surface, then you won’t notice the difference. But if this is rendering into
a video file, then the performance directly depends on the capabilities of the phone.
You can use multiple outputs as follows:
player.use(CameraInput(cameraDevice), intArrayOf(myOutput1, myOutput2, ..., myOutputN)) */
player.use(CameraInput(cameraDevice), textureOutput)
/* Loading any effect */
player.loadAsync("PineappleGlasses")
/* And running the player */
player.play()
...
// Somewhere in the destruction code
/* After you are done using the player, you must free all resources by calling
method close() */
player.close()
```
### PlayerTouchListener[](#playertouchlistener "Direct link to PlayerTouchListener")
This class represents user clicks in **Banuba SDK**. This is required by some **effects**, and is one way to interact with them.
```
// Somewhere in the initialization code
/* The player must be created and declared before use. The mySurfaceView is a UI element
and must also exist in the layout */
mySurfaceView.setOnTouchListener(PlayerTouchListener(this.applicationContext, player));
```
### FrameOutput[](#frameoutput "Direct link to FrameOutput")
Allows you to receive the processing result frames in the form of an array of pixels in the desired format and in the desired orientation.
```
// Variable declaration
private val frameOutput by lazy(LazyThreadSafetyMode.NONE) {
FrameOutput(object : FrameOutput.IFramePixelBufferProvider {
override fun onFrame(output: IOutput, framePixelBuffer: FramePixelBuffer?) {
/* This is your code for working with the framePixelBuffer */
}
})
}
...
// Somewhere in the initialization code
frameOutput.setFormat(FramePixelBufferFormat.I420_BT601_FULL)
frameOutput.setOrientation(Orientation.UP, false)
player.use(..., frameOutput)
...
// Somewhere in the destruction code
/* After finishing using the frameOutput, you must free all the resources by calling the close()
method */
frameOutput.close()
```
### SurfaceOutput[](#surfaceoutput "Direct link to SurfaceOutput")
Allows you to display the processing result on an [SurfaceView](https://developer.android.com/reference/android/view/SurfaceView).
```
// Variable declaration
/* The mySurfaceView is a UI element and must exist in the layout */
private val surfaceOutput by lazy(LazyThreadSafetyMode.NONE) {
SurfaceOutput(mySurfaceView.holder)
}
...
// Somewhere in the initialization code
player.use(..., surfaceOutput)
...
// Somewhere in the destruction code
/* After finishing using the surfaceOutput, you must free all resources by calling the close()
method */
surfaceOutput.close()
```
### TextureOutput[](#textureoutput "Direct link to TextureOutput")
Allows you to display the processing result on an [TextureView](https://developer.android.com/reference/android/view/TextureView).
```
// Variable declaration
/* The myTextureView is a UI element and must exist in the layout */
private val textureOutput by lazy(LazyThreadSafetyMode.NONE) {
TextureOutput(myTextureView)
}
...
// Somewhere in the initialization code
player.use(..., textureOutput)
...
// Somewhere in the destruction code
/* After finishing using the textureOutput, you must free all resources by calling the close()
method */
textureOutput.close()
```
### VideoOutput[](#videooutput "Direct link to VideoOutput")
The class allows you to record the processing result to a video file.
```
// Variable declaration
private val videoOutput by lazy(LazyThreadSafetyMode.NONE) {
VideoOutput()
}
...
// Somewhere in the initialization code
player.use(..., videoOutput)
/* Before you start recording a video, you must obtain permission to record
to the storage. */
videoOutput.startRecording(File("path_to/my_output_video.mp4"))
...
// Somewhere in the interruption code
/* It is necessary to interrupt video recording when it is no longer needed */
videoOutput.stopRecording()
...
// Somewhere in the destruction code
/* After you are done using the videoOutput, you must free all the resources by calling
the close() method */
videoOutput.close()
```
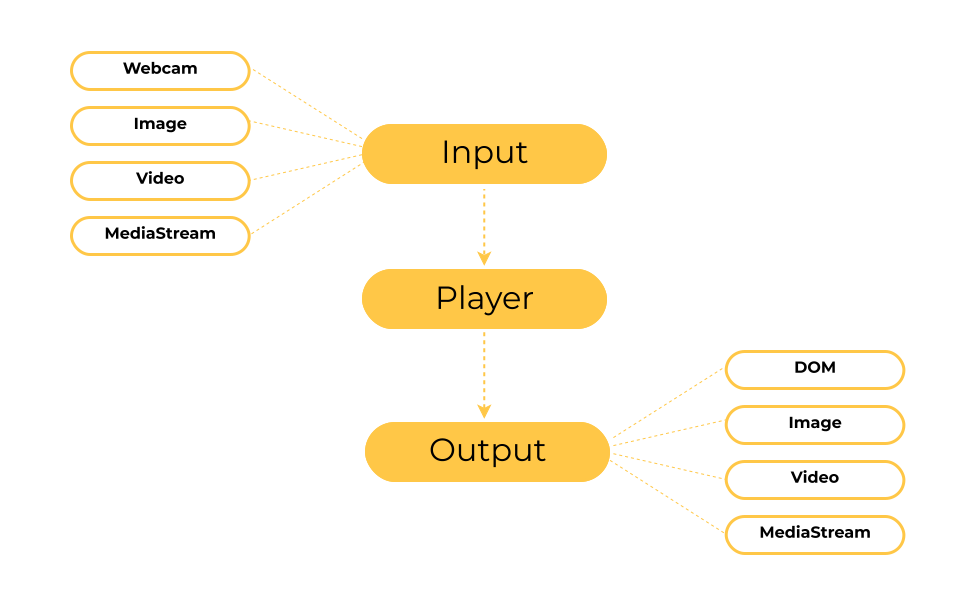
`BanubaSDK.js` exports different APIs for **Web AR** development like *Player*, *Effect*, several types of *Input* and *Output*.
A generic workflow looks like:
> *Input* -> *Player* + *Effect* -> *Output*
### Player[](#player "Direct link to Player")
The *Player* allows to consume different data inputs like webcam or image file, to apply an effect on top of it and to produce an output like rendering to DOM node or an image file.
### Effect[](#effect "Direct link to Effect")
The *Effect* allows to consume an effect or a face filter as remote or local archive.
### Input[](#input "Direct link to Input")
The *Input* can be one of the following:
* Webcam
* Image as Blob or URL
* Video as Blob or URL
* 3rd-party MediaStream like HTMLVideoElement stream or WebRTC stream
### Output[](#output "Direct link to Output")
The *Output* can be one of the following:
* HTML Element
* Image as Blob
* Video as Blob
* MediaStream that can be used by 3rd-parties like WebRTC peer connection
The plenty of input options multiplied by the plenty of output options covers lots of use cases like:
* Photo booth app with realtime webcam video processing and photo capturing
* Photo and video files post-processing app
* P2P video call app with face filter applied
And many more.
## How it looks in JavaScript[](#how-it-looks-in-javascript "Direct link to How it looks in JavaScript")
Real-time webcam video processing and DOM rendering:
```
import { Webcam, Player, Module, Effect, Dom } from "https://cdn.jsdelivr.net/npm/@banuba/webar/dist/BanubaSDK.browser.esm.js"
const player = await Player.create({ clientToken: "xxx-xxx-xxx" })
await player.addModule(new Module("https://cdn.jsdelivr.net/npm/@banuba/webar/dist/modules/face_tracker.zip"))
await player.use(new Webcam())
player.applyEffect(new Effect("Glasses.zip"))
Dom.render(player, "#webar-app")
```
And with screenshot capturing:
```
import { Webcam, Player, Effect, Module, Dom, ImageCapture } from "https://cdn.jsdelivr.net/npm/@banuba/webar/dist/BanubaSDK.browser.esm.js"
const player = await Player.create({ clientToken: "xxx-xxx-xxx" })
await player.addModule(new Module("https://cdn.jsdelivr.net/npm/@banuba/webar/dist/modules/face_tracker.zip"))
await player.use(new Webcam())
player.applyEffect(new Effect("Glasses.zip"))
Dom.render(player, "#webar-app")
const capture = new ImageCapture(player)
const photo = await capture.takePhoto()
```
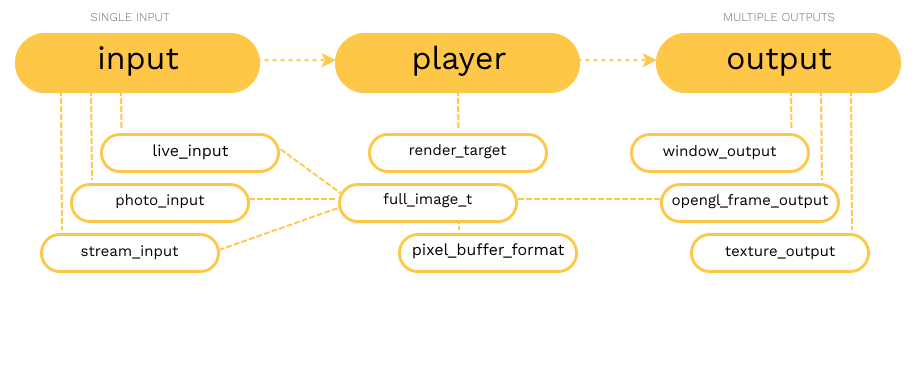
**Banuba SDK** for **desktop** can be divided into three main entities: `input`, `player` and `output`. The plethora of input options multiplied by the plethora of output options covers many use cases.
## Basic Player API interfaces:[](#basic-player-api-interfaces "Direct link to Basic Player API interfaces:")
* `bnb::player_api::interfaces::input` - receive frames and transfer them to the `player`.
* `bnb::player_api::interfaces::output` - presents frames on the surface or read in memory.
* `bnb::player_api::interfaces::player` - frames processing and rendering.
* `bnb::player_api::interfaces::render_target` - rendering context.
* `bnb::player_api::interfaces::render_delegate` - connection between the application rendering and `player` rendering.
## Input[](#input "Direct link to Input")
Processes frames from one of the producers:
* `bnb::player_api::live_input` - live stream with the ability to skip frames.
* `bnb::player_api::photo_input` - photo or image.
* `bnb::player_api::stream_input` - stream without frames skipping.
* Custom - your own implementation for the `bnb::player_api::interfaces::input` interface.
## Output[](#output "Direct link to Output")
Presents a rendered frame onto one of the available surfaces:
* `bnb::player_api::opengl_frame_output` - array of pixels, should be used with `opengl_render_target`.
* `bnb::player_api::metal_frame_output` - array of pixels, should be used with `metal_render_target`.
* `bnb::player_api::texture_output` - **GPU** texture, texture type depends on the used `render_target`.
* `bnb::player_api::window_output` - window should work with the same **GAPI** as the used `render_target`.
* Custom - your own implementation for the `bnb::player_api::interfaces::output` interface.
## Player[](#player "Direct link to Player")
* `bnb::player_api::player` - processes frames and applies effects.
## Render target[](#render-target "Direct link to Render target")
* `bnb::player_api::opengl_render_target` - **OpenGL** implementation for the `render_target`
* `bnb::player_api::metal_render_target` - **Metal** implementation for the `render_target`.
## Render delegate[](#render-delegate "Direct link to Render delegate")
This is always a custom implementation. To implement the interface, you need to inherit from interface `bnb::player_api::interfaces::render_delegate` and override three methods:
* `activate()` - activating the rendering context, if necessary.
* `started()` - frame rendering has started. After this, `finished(...)` will be called.
* `finished(int64_t frame_number)` - frame rendering has ended. The frame number is any non-negative number. If `-1` is passed, then the frame rendering has failed.
## Input and output of user data[](#input-and-output-of-user-data "Direct link to Input and output of user data")
The **input** and the **output** can operate on a pixel buffer.
* `bnb::full_image_t` - provides access to an array of pixels as a byte buffer.
* `bnb::pixel_buffer_format` - pixel buffer format can be one of: `bpc8_rgb`, `bpc8_rgba`, `bpc8_bgr`, `bpc8_bgra`, `bpc8_argb`, `i420`, `nv12`.
## Use cases[](#use-cases "Direct link to Use cases")
### live\_input[](#live_input "Direct link to live_input")
Used to receive and subsequently process frames in real time. If a new frame is received and the player has not yet processed the previous frame, the new frame will be skipped. Suitable for receiving frames from a camera.
```
#include
...
// Creating an instance
auto input = bnb::player_api::live_input::create();
...
// Adding an input to the player
player->use(input);
...
// Somewhere in the loop
auto frame = bnb::full_image_t::create_bpc8(...);
auto frame_time = get_my_current_timestamp_us();
// Pushing frame asynchronously into input
input.push(frame, frame_time);
```
### photo\_input[](#photo_input "Direct link to photo_input")
Used for obtaining and subsequent processing of photographs.
```
#include
...
// Creating an instance
auto input = bnb::player_api::photo_input::create();
...
// Adding an input to the player
player->use(input);
... auto filepath = std::string("/path/to/the/photo.png");
// Somewhere where need to upload a photo
input.push(filepath);
```
### stream\_input[](#stream_input "Direct link to stream_input")
Used to receive and subsequently process a stream of frames. Does not skip frames if the previous frame is still not processed. Suitable for processing video streams.
```
#include
...
// Creating an instance
auto input = bnb::player_api::stream_input::create();
...
// Adding an input to the player
player->use(input);
...
// Somewhere in the loop
auto frame = bnb::full_image_t::create_bpc8(...);
auto frame_time = get_my_video_timestamp_us();
// Pushing frame synchronously into input
input.push(frame, frame_time);
```
### Custom input[](#custom-input "Direct link to Custom input")
A custom **input** is needed if the standard implementation does not contain the required logic.
```
#include
#include
class my_custom_input : public bnb::player_api::interfaces::input
{
public:
my_custom_input()
{
auto config = bnb::interfaces::processor_configuration::create();
m_frame_processor = bnb::interfaces::frame_processor::create_video_processor(config);
}
void my_custom_push_method(...)
{
m_timestamp_us = get_timestamp();
auto fi = bnb::full_image_t::create_bpc8(...); // create an RGB image
auto fd = bnb::interfaces::frame_data::create();
fd->add_full_img(fi);
fd->add_timestamp_us(m_timestamp_us);
m_frame_processor->push(fd);
}
frame_processor_sptr get_frame_processor() const noexcept override
{
return m_frame_processor;
}
uint64_t get_frame_time_us() const noexcept override
{
return m_timestamp_us;
}
private:
bnb::player_api::frame_processor_sptr m_frame_processor;
uint64_t m_timestamp_us;
};
```
### opengl\_frame\_output[](#opengl_frame_output "Direct link to opengl_frame_output")
Allows you to receive the processing result frames as an array of pixels in the desired format and orientation.
Important
`opengl_frame_output` only works in conjunction with `opengl_render_target`.
```
#include
...
// Creating an instance
auto output = bnb::player_api::opengl_frame_output::create([](const bnb::full_image_t& image) {
// We work here with the resulting `image`
},
bnb::pixel_buffer_format::bpc8_rgba);
output->set_orientation(bnb::orientation::left, true);
...
// Adding an output to the player
player->use(output);
```
### metal\_frame\_output[](#metal_frame_output "Direct link to metal_frame_output")
Allows you to receive the processing result frames as an array of pixels in the desired format and orientation.
Important
`metal_frame_output` only works in conjunction with `metal_render_target` and it available only on `Apple` platform.
```
#include
...
// Creating an instance
auto output = bnb::player_api::metal_frame_output::create([](const bnb::full_image_t& image) {
// We work here with the resulting `image`
},
bnb::pixel_buffer_format::bpc8_rgba);
output->set_orientation(bnb::orientation::left, true);
...
// Adding an output to the player
player->use(output);
```
### texture\_output[](#texture_output "Direct link to texture_output")
Allows you to get texture.
```
#include
...
// Creating an instance
auto output = bnb::player_api::texture_output::create([](const bnb::player_api::texture_t texture) {
// We work here with the resulting `texture`
});
...
// Adding an output to the player
player->use(output);
```
### window\_output[](#window_output "Direct link to window_output")
Renders frames onto the window surface, at the specified location, and in the specified orientation.
```
#include
...
// Creating an instance with opengl_render_target
auto output = bnb::player_api::window_output::create(nullptr);
...
// Or creating an instance with metal_render_target
CAMetalLayer* metal_layer = get_my_metal_layer();
// When using metal rendering, you need to pass the render layer.
auto output = bnb::player_api::window_output::create(static_cast(metal_layer));
...
// Setup orientaion and mirroring
output->set_orientation(bnb::orientation::left, true);
...
// Adding an output to the player
player->use(output);
...
// Set the rendering size and position.
output->set_frame_layout(position_left, position_top, render_width, render_height);
```
### Custom output[](#custom-output "Direct link to Custom output")
A custom **output** is needed if the standard implementation does not contain the required logic.
```
#include
... class my_custom_output : public bnb::player_api_interfaces
{
public:
void attach() override
{ /* output is attached to the player */
}
void detach() override
{ /* output is detached from the player */
}
void present(const bnb::player_api::render_target_sptr& render_target) override
{
// custom code
... render_target->present(position_left, position_top, render_width, render_height, my_orientaion_matrix_4x4);
}
};
```
### full\_image\_t[](#full_image_t "Direct link to full_image_t")
Three functions are available to create images in different formats:
* `bnb::full_image_t::create_bpc8` - for image formats `bpc8_rgb`, `bpc8_rgba`, `bpc8_bgr`, `bpc8_bgra`, `bpc8_argb`.
* `bnb::full_image_t::create_nv12` - for nv12 yuv images with `bt601` or `bt709` color standard and with `full` or `video` color range.
* `bnb::full_image_t::create_i420` - for i420 yuv images with `bt601` or `bt709` color standard and with `full` or `video` color range.
```
#include
...
// creating RGB image
auto rgb_image = bnb::full_image_t::create_bpc8(
rgb_image_data, // uint8_t* raw pointer to image data
width * 3, // rgb image stride.
width, // width of the image
height, // height of the image
bnb::pixel_buffer_format::bpc8_rgb, // image format
bnb::orientation::up, // image orientation
false, // image mirroring
[](uint8_t* data) { /* deleting the image data */ } // deleter of the image data
);
```
Retrieving image data:
```
#include
...
// Getting RGB image data
auto rgb_image = bnb::full_image_t::create_bpc8(...);
uint8_t* rgb_image_bytes = rgb_image.get_base_ptr_of_plane(0);
int32_t width = rgb_image.get_width_of_plane(0);
int32_t height = rgb_image.get_height_of_plane(0);
int32_t stride = rgb_image.get_bytes_per_row_of_plane(0);
```
### player[](#player-1 "Direct link to player")
The **player** requests frames from the input, then processes those frames using the Banuba SDK and passes the results to one or more outputs. Default frame processing in Banuba SDK works automatically. If you wish, you can enable on-demand processing.
```
#include
... auto fps = 30;
auto render_target = /* render target */;
auto renderer = /* my custom renderer */
// Creating an instance
auto player = bnb::player_api::player::create(fps, render_target, renderer);
...
// Configuring the player and loading the effect
player->use(/* some input */)
.use(/* some output */)
.use(/* some output */);
player->load_async(/* path to the effect */);
```
### opengl\_render\_target[](#opengl_render_target "Direct link to opengl_render_target")
The render target allows the player to render frames processed by the player onto outputs using OpenGL technology.
Important
`opengl_render_target` only works with OpenGL based outputs.
```
#include
...
// Creating an instance
auto render_target = bnb::player_api::opengl_render_target::create();
...
// Attach render target to the player
auto player = bnb::player_api::player::create(/* fps value */, render_target, /* some renderer */);
```
### metal\_render\_target[](#metal_render_target "Direct link to metal_render_target")
The render target allows the player to render frames processed by the player onto outputs using OpenGL technology.
Important
`metal_render_target` only works with METAL based outputs.
```
#include
...
// Creating an instance
auto render_target = bnb::player_api::metal_render_target::create();
...
// Attach render target to the player
auto player = bnb::player_api::player::create(/* fps value */, render_target, /* some renderer */);
```
### Custom render delegate[](#custom-render-delegate "Direct link to Custom render delegate")
Necessary for connecting the **player** and application in the context of rendering.
```
class my_custom_renderer : public bnb::player_api::interfaces::render_delegate
{
public:
my_custom_renderer()
{
}
void activate() override
{ /* make context current */
}
void started() override
{ /* frame rendering started */
}
void finished(int64_t frame_number) override
{ /* frame rendering finished */
}
};
```
Still have any questions about FaceAR SDK?
Visit our [FAQ](https://www.banuba.com/faq/) or [contact our support](/far-sdk/support/.md).